
Identifying Overheating Issues
Laptop overheating is a common problem that can significantly impact performance and even damage your device. Recognizing the signs and understanding the causes are crucial steps in preventing more serious issues. Early detection and appropriate action can save you from costly repairs or data loss.
Overheating manifests in several ways, often subtle at first. These symptoms can range from minor annoyances to serious performance disruptions.
Common Signs of Laptop Overheating
Several noticeable indicators point towards your laptop struggling with excessive heat. These symptoms can appear individually or in combination, increasing in severity as the problem worsens. Ignoring these signs can lead to more significant problems.
A consistently high operating temperature is the most obvious sign. This is often accompanied by a loud fan noise, as the cooling system works overtime to compensate. The laptop may also exhibit performance slowdowns, unexpected shutdowns, or even system crashes. The exterior of the laptop, particularly the base and around the vents, may feel excessively hot to the touch. In severe cases, you might even smell burning components.
Potential Causes of Laptop Overheating
Many factors can contribute to laptop overheating. These can range from simple issues like dust accumulation to more complex hardware problems. Understanding the cause is the first step towards effective troubleshooting.
| Manufacturer | Model | Cause | Solution |
|---|---|---|---|
| Dell | XPS 15 | Dust buildup in cooling fans | Regular cleaning of vents and internal components |
| HP | Spectre x360 | Insufficient airflow due to obstructed vents | Ensure laptop is on a flat, hard surface with adequate ventilation |
| Apple | MacBook Pro | Overly demanding applications running simultaneously | Close unnecessary applications, reduce multitasking |
| Asus | ROG Zephyrus | Failing cooling fan | Repair or replace the faulty fan |
| Lenovo | ThinkPad X1 Carbon | Worn-out thermal paste | Reapply thermal paste (requires technical expertise) |
Monitoring Laptop Temperature
Accurately monitoring your laptop’s temperature is essential for identifying and addressing overheating problems. Both built-in tools and third-party software offer effective ways to track these vital statistics.
Most operating systems include built-in tools to monitor system performance, which often includes temperature readings. For example, Windows Task Manager provides CPU and GPU usage information, which can indirectly indicate high temperatures. macOS Activity Monitor offers similar functionality. However, these built-in tools may not provide comprehensive temperature data.
Third-party software applications offer more detailed temperature monitoring capabilities. These applications often provide real-time readings from various components, including the CPU, GPU, and hard drive. They often offer graphical representations of temperature changes over time, enabling users to identify trends and potential problems. Examples include HWMonitor, Core Temp, and Open Hardware Monitor.
Situations Leading to Overheating
Overheating is more likely to occur under specific circumstances. Understanding these scenarios helps in proactive prevention.
High ambient temperatures, such as those experienced during hot summer months or in poorly ventilated rooms, significantly increase the risk of overheating. Running demanding applications, such as video games or video editing software, puts considerable strain on the system’s components, generating more heat. Using the laptop on soft surfaces, like a bed or carpet, restricts airflow and can lead to overheating. Finally, prolonged periods of heavy use without breaks can also contribute to excessive heat buildup.
Troubleshooting Overheating
Laptop overheating is a common problem, often stemming from a combination of factors. Effective troubleshooting requires a systematic approach to pinpoint the root cause, ranging from simple cleaning to more complex hardware issues. This section details the steps involved in diagnosing and resolving overheating problems.
Identifying the Source of Overheating
Determining the cause of overheating involves a process of elimination. We’ll examine common culprits, such as dust accumulation, malfunctioning fans, and demanding software. A visual inspection is the first step, followed by more in-depth diagnostic methods.
Dust buildup significantly restricts airflow, leading to increased temperatures. A faulty fan, whether failing to spin or operating inefficiently, will also contribute to overheating. Resource-intensive software, particularly games or video editing programs, can push the processor and graphics card to their thermal limits. Finally, a failing thermal paste application between the processor/GPU and the heatsink prevents efficient heat dissipation.
Cleaning the Laptop’s Internal Components
Cleaning your laptop’s internal components is crucial for maintaining optimal airflow and preventing overheating. This process requires caution and should be undertaken with the laptop powered off and unplugged. Improper handling could damage delicate internal components.
Step-by-Step Guide (with image descriptions):
- Power Down and Disconnect: Completely shut down your laptop and disconnect the power adapter.
- Access the Internal Components: Locate and remove the access panel(s) to the internal components. This usually involves unscrewing several small screws, often located on the bottom of the laptop. (Image description: A detailed image would show the location of the access panel screws, clearly marked with arrows. The image should also show the type of screwdriver needed – usually a Phillips head.)
- Dust Removal: Use a compressed air canister to gently blow away dust from the fan blades, heatsink fins, and other internal components. Hold the canister upright and use short bursts to avoid damaging components. (Image description: The image would depict the correct technique of holding the compressed air canister at a slight angle, directing the air flow from the heatsink towards the back of the laptop. It would also highlight the importance of keeping the canister upright to avoid propellant leakage.)
- Fan Inspection: Visually inspect the fan blades for any obstructions or damage. If the fan is not spinning freely, it may need to be replaced. (Image description: An image would show a close-up view of a laptop fan, highlighting the blades and any potential obstructions or damage. Another image would show a clean fan for comparison.)
- Reassembly: Carefully replace the access panel and screws. (Image description: This image would illustrate the correct placement of the access panel and screws during reassembly, showing the alignment points and screw locations clearly.)
Diagnostic Tools and Methods
Several tools and methods can help pinpoint the source of overheating. These range from simple temperature monitoring software to more advanced hardware diagnostics.
Software-based monitoring tools provide real-time temperature readings for the CPU, GPU, and other components. These tools often include visual graphs and alerts to indicate when temperatures exceed safe thresholds. Examples include HWMonitor and Core Temp. Hardware-based monitoring, while less common in laptops, involves using specialized devices to directly measure temperatures at various points within the system. These are more often used in desktop systems for detailed analysis. Visual inspection, as previously mentioned, is a critical first step, allowing for identification of dust buildup or physical damage. A simple stress test using software like Prime95 or FurMark can push the system to its limits, allowing you to observe temperature behavior under load and identify potential bottlenecks.
Troubleshooting Flowchart
The following flowchart Artikels a systematic approach to troubleshooting laptop overheating:
(Image description: The flowchart would visually represent the troubleshooting process. It would start with “Laptop Overheating?” and branch into various diagnostic steps. These steps would include: Visual inspection for dust, checking fan operation, running temperature monitoring software, and testing with stress test software. Each step would lead to either a solution (e.g., cleaning, fan replacement, software optimization) or further investigation. The flowchart would clearly show the decision points and the flow of the troubleshooting process.)
Cooling Solutions and Prevention
Laptop overheating is a common problem, but thankfully, there are many effective ways to mitigate it and prevent future issues. Understanding the various cooling solutions available, along with implementing preventative measures, can significantly extend the lifespan of your laptop and improve its performance. This section will explore various cooling options and provide practical advice on maintaining optimal operating temperatures.
Cooling Solutions
Several options exist to improve your laptop’s cooling. Choosing the right solution depends on your budget, the severity of the overheating, and your portability needs.
- Cooling Pads: These are flat platforms with built-in fans that sit underneath the laptop, drawing heat away from the bottom. They are relatively inexpensive and easy to use.
- Laptop Stands: These elevate the laptop, improving airflow underneath. While they don’t actively cool the device like fans, they passively enhance ventilation.
- External Fans: These are small, portable fans that can be positioned to direct airflow onto the laptop’s vents. They offer a more direct cooling solution compared to pads or stands.
Advantages and Disadvantages of Cooling Solutions
Each cooling solution presents its own set of advantages and disadvantages.
- Cooling Pads: Advantages include affordability and ease of use. Disadvantages include potential noise from the fans and limited effectiveness for extremely high heat generation.
- Laptop Stands: Advantages include portability, low noise, and affordability. Disadvantages include a lack of active cooling; they only improve passive ventilation.
- External Fans: Advantages include targeted cooling and potentially high effectiveness. Disadvantages include potential noise and may require careful placement for optimal results. They also add another item to carry around.
Comparison of Cooling Solutions
The following table compares different cooling solutions based on price, effectiveness, and portability. Note that effectiveness is subjective and depends on the laptop model and ambient temperature. Prices are approximate and can vary based on brand and features.
| Cooling Solution | Price Range (USD) | Effectiveness | Portability |
|---|---|---|---|
| Basic Cooling Pad | $10 – $30 | Moderate | High |
| High-Performance Cooling Pad | $30 – $80 | High | Moderate |
| Simple Laptop Stand | $10 – $20 | Low | High |
| Ergonomic Laptop Stand | $20 – $50 | Low to Moderate | Moderate |
| Small External Fan | $15 – $35 | Moderate to High | High |
Preventing Laptop Overheating
Proactive measures are crucial in preventing overheating. These practices minimize the strain on the cooling system and prolong the laptop’s lifespan.
- Ensure Proper Ventilation: Avoid placing the laptop on soft surfaces like beds or carpets, which obstruct airflow. Use a hard, flat surface and ensure vents are unobstructed.
- Software Optimization: Close unnecessary applications and limit resource-intensive processes. Regularly uninstall unused programs and keep your operating system updated.
- Clean Regularly: Dust accumulation in the vents significantly reduces cooling efficiency. Regularly clean the vents using compressed air.
- Monitor Temperatures: Use monitoring software to track your laptop’s temperature. This allows you to identify potential issues early on.
- Avoid Direct Sunlight: Direct sunlight can significantly increase the laptop’s internal temperature. Avoid using your laptop in direct sunlight whenever possible.
Software-Related Overheating
Software applications, particularly resource-intensive ones, can significantly contribute to laptop overheating. Understanding which programs consume the most resources and implementing strategies to manage them is crucial for maintaining optimal operating temperatures. This section will explore identifying these applications, monitoring resource usage, and optimizing software settings to mitigate heat generation.
Software applications demanding significant processing power, such as video editing software, 3D rendering programs, and gaming clients, are prime suspects in causing excessive heat. Less obvious culprits include poorly optimized applications, numerous simultaneously running background processes, and even certain system services. The impact of these applications is directly proportional to their resource demands on the CPU, GPU, and RAM.
Identifying Resource-Intensive Processes
Monitoring resource usage allows for the pinpointing of applications responsible for high CPU, GPU, or RAM utilization. Most operating systems provide built-in tools for this purpose. For Windows, Task Manager provides a real-time view of CPU, memory, and disk usage by individual processes. On macOS, Activity Monitor offers similar functionality. These tools typically display a list of running applications, along with their respective resource consumption levels. By observing which processes consistently show high usage, especially during periods of overheating, one can readily identify the problematic software. For instance, a video editing program might show high CPU and RAM usage, while a demanding game might utilize both the CPU and GPU extensively.
Optimizing Software Settings to Reduce Heat Generation
Many applications offer settings that directly impact their resource consumption. Reducing the resolution or detail level in graphically intensive applications, such as games or video editing software, can significantly lessen the load on the GPU and CPU, leading to lower temperatures. Disabling unnecessary features or effects within applications can also free up resources. For example, turning off real-time previews or high-resolution textures in image editing software can reduce processing demands. Similarly, lowering the refresh rate of your display can decrease GPU load. These adjustments are often found within the application’s preferences or settings menus.
Managing Background Processes and Limiting Concurrent Applications
Background processes, while often essential for system functionality, can collectively consume substantial resources. Managing these processes involves identifying and closing unnecessary ones. On Windows, the Task Manager allows for ending background processes. macOS’s Activity Monitor provides similar functionality. Additionally, limiting the number of applications running simultaneously is crucial. Avoid opening numerous programs at once, especially resource-intensive ones. Prioritize closing applications not actively in use to free up system resources and reduce the overall heat load. Regularly restarting your laptop can also help clear out lingering background processes and improve overall system performance and thermal management.
Hardware-Related Overheating
Laptop overheating isn’t always a software problem; often, the culprit lies within the hardware itself. Understanding the components involved and their role in heat generation is crucial for effective troubleshooting and preventative maintenance. This section will explore common hardware contributors to overheating, the importance of thermal paste, and potential hardware failures that can lead to elevated temperatures.
Overheating components commonly include the CPU, GPU, and hard drive (or SSD, though less prone to overheating). Each generates heat during operation, and insufficient cooling mechanisms can lead to performance throttling and potential damage.
Common Hardware Components Contributing to Overheating
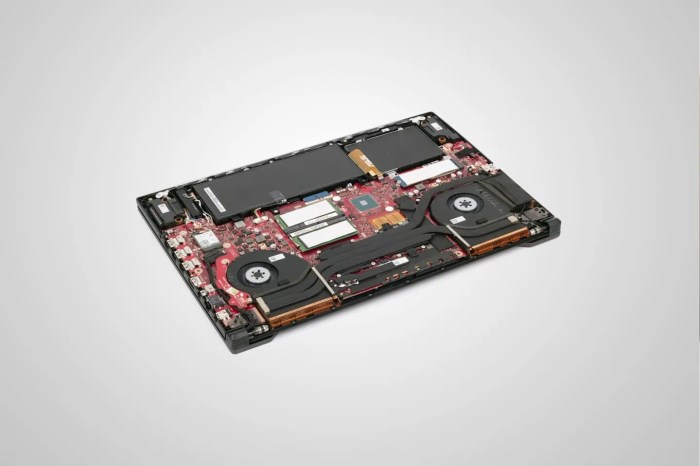
The central processing unit (CPU) is the brain of your laptop, performing billions of calculations per second. This intense processing generates significant heat. Similarly, the graphics processing unit (GPU), responsible for rendering images and videos, is another major heat producer, especially during graphically demanding tasks like gaming or video editing. Hard disk drives (HDDs), with their moving parts, also generate heat, although typically less than the CPU or GPU. Solid-state drives (SSDs), being flash memory-based, produce significantly less heat.
The Importance of Thermal Paste and Heat Dissipation
Thermal paste acts as a crucial intermediary between the heat-generating components (CPU and GPU) and their respective heat sinks. It fills microscopic gaps between the component and the heatsink, ensuring efficient heat transfer. Without sufficient thermal paste, or with dried-out or improperly applied paste, heat transfer is significantly impeded, leading to higher component temperatures and potential overheating. The paste’s role is to maximize surface contact for optimal heat conduction. This allows the heat sink to effectively draw heat away from the component and dissipate it into the surrounding air via the cooling fan.
Replacing Thermal Paste: A Step-by-Step Guide (For Experienced Users Only)
Replacing thermal paste requires careful attention to detail and a degree of technical expertise. Improper handling can damage components. This guide is for experienced users only. Begin by powering down the laptop and disconnecting the power adapter. Then, carefully disassemble the laptop to access the CPU and/or GPU heat sinks. (Image description: A detailed image would show a disassembled laptop, with the CPU and heat sink clearly visible. Arrows would point to relevant screws and components.) Once the heat sink is removed, gently clean the old thermal paste from both the CPU/GPU and the heat sink using isopropyl alcohol and a lint-free cloth. (Image description: An image showcasing the careful cleaning of the CPU and heatsink with a lint-free cloth and isopropyl alcohol.) Apply a small pea-sized amount of new thermal paste to the center of the CPU/GPU. (Image description: An image showing the correct application of a pea-sized amount of thermal paste to the center of the CPU.) Carefully reattach the heat sink, ensuring even pressure across the entire surface. (Image description: An image depicting the careful reattachment of the heat sink, ensuring even contact.) Reassemble the laptop, and test its operation.
Potential Hardware Failures Leading to Overheating
Failing cooling fans are a common cause of overheating. A malfunctioning fan may fail to spin, spin too slowly, or produce excessive noise, indicating bearing wear. (Image description: An image showing a laptop with a visibly damaged or malfunctioning cooling fan.) Similarly, a clogged heatsink can significantly impede heat dissipation. Dust accumulation restricts airflow, forcing the components to operate at higher temperatures. (Image description: An image comparing a clean heatsink to one clogged with dust, highlighting the difference in airflow.) In severe cases, hardware components themselves may fail due to prolonged exposure to high temperatures, requiring repair or replacement. This could manifest as a complete CPU or GPU failure. For example, a damaged CPU might cause the system to become unstable or boot intermittently, and the only solution would be to replace the damaged component.