Understanding the Blue Screen of Death (BSOD)
The Blue Screen of Death, or BSOD, is a critical error screen in Windows that indicates a serious system problem. It abruptly halts your computer’s operation, displaying a blue screen with error codes and technical information. Understanding the cause and effectively recording the information displayed is crucial for troubleshooting and resolving the issue.
The appearance of a BSOD typically signifies a critical failure within the operating system, hardware, or driver software. These failures can range from minor glitches to major hardware malfunctions. Ignoring a BSOD is not advisable, as the underlying problem could lead to data loss or further system instability.
BSOD Error Types and Causes
Different BSOD errors correspond to various system problems. For instance, errors related to memory management (e.g., `MEMORY_MANAGEMENT`) often point to RAM issues, while driver-related errors (e.g., `IRQL_NOT_LESS_OR_EQUAL`) often indicate problems with device drivers. Errors referencing specific hardware components, such as a hard drive, will point towards the source of the problem. Some common causes include faulty RAM, failing hard drives, incompatible or corrupted drivers, overheating components, and software conflicts. Identifying the specific error code is the first step in diagnosing the problem.
Information Displayed on a BSOD
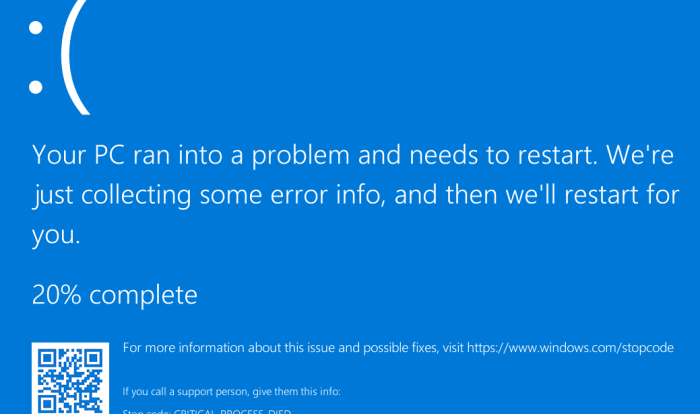
A typical BSOD displays several key pieces of information that are vital for troubleshooting. This includes a stop code (e.g., `0x0000007B`), a technical description of the error, and sometimes a file path or driver name involved. The stop code is a hexadecimal number that uniquely identifies the type of error. The technical description usually provides a brief explanation of the error in technical terms. Additional information, such as the affected driver or memory location, can aid in pinpointing the source of the problem. The information presented is often cryptic to non-technical users, but crucial for experienced troubleshooters.
Recording the BSOD Error Code and Stop Code
Quickly capturing the error information is essential before the screen disappears. Since the BSOD often only appears briefly, immediate action is necessary.
- Take a Picture: If possible, use a camera or smartphone to take a picture of the entire screen. This captures all the displayed information. Ensure the image is clear and legible.
- Use the Print Screen Key: Press the “Print Screen” (PrtScn) key on your keyboard. This copies the screen’s contents to your clipboard. You can then paste this image into an image editor or document.
- Check Event Viewer (After Reboot): After the system restarts, open the Event Viewer (search for it in the Start Menu). Look in the Windows Logs > System section for entries around the time of the crash. These logs often contain additional information about the BSOD, including the stop code and related details. This is a useful alternative if you couldn’t capture the screen during the crash itself.
Once you have recorded the error code and stop code, you can use online resources and search engines to find information about the specific error and potential solutions. Remember to always back up your important data regularly to mitigate potential data loss due to system crashes.
Basic Troubleshooting Steps
Before diving into more complex solutions, let’s tackle some simple, yet effective, troubleshooting steps that often resolve a Blue Screen of Death (BSOD). These initial checks can save you considerable time and effort. Addressing these basic issues first significantly increases your chances of a quick fix.
These initial steps focus on the most common causes of BSODs, ranging from simple hardware issues to outdated software. By systematically checking these points, you can often pinpoint the problem and resolve it without needing advanced technical expertise.
Restarting the Computer and Checking Connections
A simple restart can sometimes resolve temporary software glitches that might be causing the BSOD. This allows the system to clear its memory and reload processes. Furthermore, loose or faulty connections can disrupt the flow of data, leading to system instability. Therefore, physically inspecting your computer’s connections is crucial.
- Restart the computer: Power down completely, wait 30 seconds, and then power back on. This often clears temporary software errors.
- Check power cable connections: Ensure the power cable is securely connected to both the computer and the power outlet. Try a different outlet if possible.
- Inspect data and peripheral cables: Examine all cables connecting to your computer, including USB devices, monitors, and external hard drives. Reseat any loose connections.
- Check for overheating: Ensure your computer has adequate ventilation. Dust buildup can cause overheating, leading to system instability and BSODs. Clean any vents or fans.
Updating Drivers
Outdated or corrupted drivers are a frequent cause of BSODs. Drivers are software that allows your operating system to communicate with hardware components. Outdated drivers may lack compatibility or contain bugs that can lead to system crashes. Regularly updating drivers is a proactive step to prevent these issues.
Identifying outdated drivers requires navigating your computer’s Device Manager. Here’s how:
- Open the Device Manager (search for it in the Windows search bar).
- Expand each category (e.g., Display adapters, Network adapters, etc.).
- Right-click on each device and select “Properties”.
- Go to the “Driver” tab. Check the “Driver Version” to see if it’s up-to-date. You can also search online for the latest driver version for your specific device model.
- If a driver is outdated, click “Update Driver” and follow the on-screen instructions. You can choose to search automatically for drivers or manually provide the driver’s location (if you’ve downloaded it).
Basic Troubleshooting Flowchart
The following flowchart visually represents the decision-making process for basic BSOD troubleshooting:
[Imagine a flowchart here. The flowchart would start with a “BSOD Occurs?” Yes/No decision point. If yes, it would branch to “Restart Computer?” Yes/No. If yes, then “BSOD Resolved?” Yes/No. If no, it would branch to “Check Connections?” Yes/No. If yes, then “BSOD Resolved?” Yes/No. If no, it would branch to “Update Drivers?” Yes/No. If yes, then “BSOD Resolved?” Yes/No. If no at any point, it would lead to “Proceed to Advanced Troubleshooting”.]
Advanced Troubleshooting Techniques
If basic troubleshooting steps haven’t resolved your Blue Screen of Death (BSOD), more advanced techniques may be necessary. These methods delve deeper into your system’s configuration and require a more methodical approach. Remember to always back up important data before attempting any significant system changes.
System Restore utilizes previously saved system snapshots (restore points) to revert your computer to a stable state before the BSOD occurred. This effectively undoes system changes made since the restore point was created, potentially resolving the issue. Successful restoration requires a correctly configured restore point created before the problem arose.
System Restore Functionality
System Restore is a built-in Windows utility that creates restore points at regular intervals and after significant system events, such as software installations or driver updates. By restoring to a previous point, you can potentially reverse the changes that caused the BSOD. To access System Restore, search for “Create a restore point” in the Windows search bar, open the System Properties window, and click the “System Restore” button. Choose a restore point from the list of available dates and follow the on-screen instructions. It’s important to note that restoring to a previous point might remove some recently installed applications or drivers.
Comparison of System Recovery Options
Windows offers several system recovery options, each with its own advantages and disadvantages. System Restore, as discussed above, is a relatively non-destructive method. However, if System Restore fails to resolve the BSOD, more drastic measures might be required. These include Startup Repair (attempts to automatically fix boot problems), a System Image Restore (restores your entire system from a previously created backup image), and a clean installation of Windows (a complete wipe and reinstall of the operating system). A System Image Restore is a more comprehensive recovery method than System Restore, requiring a pre-existing backup image of your entire system drive. A clean installation is the most thorough but also the most time-consuming and data-destructive option, requiring a full reinstallation of Windows and all applications.
Hardware Diagnostics for BSODs
While software issues frequently cause BSODs, hardware problems can also be the culprit. Faulty RAM, a failing hard drive, or an overheating CPU are common culprits. Diagnosing hardware issues requires a more hands-on approach.
Memory testing tools, like Windows Memory Diagnostic, can check for errors in your RAM. This tool can be accessed through the Windows search bar. Running a memory test involves restarting your computer and allowing the tool to perform a comprehensive scan. Any errors reported during this test indicate potential RAM problems. Similarly, hard drive diagnostic tools, either built into Windows or provided by the hard drive manufacturer, can check for bad sectors or other issues on your hard drive. These tools usually provide a detailed report indicating the health of your hard drive. Finally, monitoring CPU temperature using system monitoring software can help identify overheating issues. Excessive CPU temperatures can lead to system instability and BSODs. If temperatures consistently exceed recommended limits, consider improving your computer’s cooling system.
Software-Related Issues
Software conflicts are a frequent culprit behind the dreaded Blue Screen of Death (BSOD). Incompatible programs, outdated drivers, or corrupted system files can all lead to system instability and ultimately, a crash. Addressing these software-related issues is crucial in resolving many BSOD occurrences. Understanding the potential sources of these conflicts and employing systematic troubleshooting techniques can significantly improve your chances of a quick fix.
Software conflicts can manifest in various ways, from minor glitches to complete system failures. Identifying the specific software causing the problem often requires a methodical approach, starting with basic troubleshooting and progressing to more advanced techniques if necessary. This section will Artikel common software conflict sources and effective strategies for resolving them.
Common Software Conflicts
Many different software programs and their interactions can trigger BSODs. These conflicts aren’t always obvious, and pinpointing the exact cause can take time. However, some common culprits include conflicting antivirus programs (having multiple security suites installed simultaneously), outdated or corrupted device drivers (especially graphics card drivers), and recently installed applications that may be incompatible with existing software or the operating system. Furthermore, poorly coded or buggy applications can also introduce instability.
Performing a Clean Boot
A clean boot starts Windows with a minimal set of drivers and startup programs. This helps isolate whether a third-party application or startup item is causing the BSOD. By temporarily disabling non-essential software, you can determine if the problem persists. If the BSOD disappears during a clean boot, you know the issue lies within one of the disabled programs or services.
To perform a clean boot, you need to access the System Configuration utility (msconfig.exe). Within this utility, you’ll find options to selectively disable startup programs and services. Microsoft’s support documentation provides detailed instructions on how to perform a clean boot for different versions of Windows. After rebooting in clean boot mode, test for the BSOD. If it doesn’t appear, gradually re-enable startup items and services, restarting your computer after each re-enablement to identify the culprit.
Uninstalling Recently Installed Programs or Drivers
If you’ve recently installed new software or updated drivers before experiencing BSODs, these are prime suspects. Uninstalling them is a straightforward troubleshooting step that often resolves the problem. This is because the new software might be incompatible with your system, or the updated driver may contain bugs.
To uninstall a program, navigate to the Control Panel (in Windows 10 and 11, search for “Control Panel”), select “Programs and Features,” locate the recently installed program, and click “Uninstall.” For drivers, you can usually uninstall them through the Device Manager (accessible by searching for “Device Manager”). Locate the device with the problematic driver, right-click it, and select “Uninstall device.” Remember to restart your computer after uninstalling any program or driver. If the BSOD ceases after uninstalling a specific program or driver, you’ve likely identified the source of the problem.
Memory Diagnostics

Random Access Memory (RAM) errors are a common culprit behind the dreaded Blue Screen of Death. Faulty RAM can lead to system instability and crashes, manifesting as BSODs with various error codes. Fortunately, Windows provides a built-in tool to diagnose these issues. This section details how to use the Windows Memory Diagnostic tool and interpret its results.
Running the Windows Memory Diagnostic tool is a straightforward process that allows you to identify potential RAM problems without needing third-party software. The test thoroughly examines your system’s RAM for errors, providing a detailed report that can help pinpoint the source of your BSODs.
Running the Windows Memory Diagnostic Tool
To initiate the memory test, search for “Windows Memory Diagnostic” in the Windows search bar. Select the top result. You will then be presented with two options: restart your computer immediately and run the test, or schedule the test for the next reboot. Choosing the immediate restart option will begin the diagnostic process immediately. The test will run automatically upon restart, requiring no further user interaction. The screen will display the progress of the memory test. Upon completion, the results will be shown upon the next boot. Alternatively, scheduling the test allows you to continue working before the test begins.
Interpreting Memory Diagnostic Results
After the memory test completes, Windows will display a summary of the results. The results will typically indicate whether any errors were found. If errors are detected, further investigation might be necessary, potentially involving replacing faulty RAM modules. The results screen usually shows a summary of the test, including the test type performed and a summary of the findings. If errors are found, it is crucial to identify the faulty RAM stick(s) and replace them to resolve BSOD issues stemming from memory problems.
Memory Diagnostic Results Table
The Windows Memory Diagnostic tool provides a concise report. While the exact wording may vary slightly depending on your Windows version, the core information remains consistent. The following table illustrates a typical format for the results:
| Test Name | Status | Details |
|---|---|---|
| Standard Test | Passed | No errors detected. |
| Extended Test | Failed | Errors detected on memory module 2 (Slot B). Specific error codes: 0x12345, 0x67890. |
Note: The “Details” column might include specific error codes, memory addresses affected, or other technical information that can help identify the problem. If errors are detected, consult your computer’s documentation or seek assistance from a technical support professional to determine the next steps.
Hard Drive Issues
A failing hard drive is a common culprit behind the dreaded Blue Screen of Death (BSOD). The erratic behavior of a failing hard drive can disrupt the operating system’s core functions, leading to system instability and ultimately, a BSOD. Understanding the signs of a failing hard drive is crucial for preventing data loss and resolving BSOD issues effectively.
Hard drive failure manifests in various ways, often subtly at first. Symptoms that might precede a BSOD include slow boot times, applications freezing or crashing unexpectedly, and the appearance of error messages related to disk read/write operations. More severe symptoms can include the system completely locking up or exhibiting unusual noises (clicking, grinding) emanating from the computer’s hard drive bay. These issues often escalate, leading to the dreaded BSOD, frequently accompanied by error codes referencing disk errors.
Checking Hard Drive Health
Regularly assessing your hard drive’s health is a proactive step in preventing BSODs and data loss. Windows offers built-in tools, while several third-party applications provide more comprehensive diagnostics. Windows’ built-in tools offer a basic assessment, while third-party utilities often provide more detailed analysis, including predictive failure analysis.
Windows provides a basic check through the reliability monitor and disk management utilities. These utilities offer limited diagnostics, focusing primarily on errors and disk space usage. Third-party software, such as CrystalDiskInfo or HD Tune, offers more in-depth analysis, including SMART (Self-Monitoring, Analysis and Reporting Technology) data, which provides insights into the drive’s overall health and potential problems. These tools display attributes like the drive’s temperature, read/write error rates, and power-on hours, allowing for a more comprehensive assessment of the drive’s health. A consistently high number of read errors or a significant drop in certain SMART attributes may indicate impending failure.
Creating a Data Backup
Before attempting any advanced troubleshooting, backing up your important data is paramount. A hard drive failure can lead to irretrievable data loss, so safeguarding your files should be a priority. Several methods exist for creating backups, depending on your needs and technical skills.
A simple backup can be created by copying essential files to an external drive, cloud storage service, or a network location. This method is suitable for smaller datasets and less technically inclined users. For a more comprehensive backup, consider using backup software. Many applications, such as Acronis True Image or Macrium Reflect, offer full system image backups, enabling a complete restoration of your system in case of a hard drive failure. These tools create an exact copy of your entire hard drive, allowing for a quick and easy recovery. Regularly scheduling backups is crucial; a schedule tailored to the frequency of data changes ensures data remains protected. Consider the frequency of data changes when establishing your backup schedule. For example, a user with frequent data changes might opt for daily backups, whereas a user with less frequent changes might only need weekly or monthly backups.
Preventing Future BSODs
Experiencing a Blue Screen of Death is undeniably frustrating, but proactive measures can significantly reduce their occurrence. By implementing preventative strategies and maintaining a healthy system, you can enjoy a more stable and reliable computing experience. This section Artikels key steps to minimize the risk of future BSODs.
Regular maintenance and updates are crucial for preventing future blue screen errors. Ignoring these essential tasks can lead to accumulating problems that eventually manifest as system crashes. Proactive maintenance, on the other hand, creates a robust and resilient system capable of handling unexpected issues with grace.
Regular Windows and Driver Updates
Keeping your Windows operating system and device drivers up-to-date is paramount. Updates often include critical bug fixes and performance improvements that directly address issues that could trigger BSODs. Outdated drivers, in particular, are a common culprit, as they may be incompatible with newer hardware or software, leading to conflicts and system instability. Windows Update automatically checks for and installs updates, but it’s good practice to manually check for updates periodically to ensure you have the latest patches. For drivers, check the manufacturer’s website for the latest versions specific to your hardware. Installing updates from untrusted sources should always be avoided to prevent introducing malware or corrupt drivers.
Best Practices for Maintaining a Healthy Windows System
A well-maintained system is less prone to crashes. Here are some best practices to follow:
- Regularly scan for malware and viruses: Employ a reputable antivirus program and schedule regular scans to detect and remove any malicious software that could destabilize your system.
- Defragment your hard drive (if using an HDD): Defragmentation reorganizes files on your hard drive, improving access times and overall system performance. This is less critical for SSDs (Solid State Drives) which don’t suffer from the same fragmentation issues.
- Manage startup programs: Many programs automatically launch when you start your computer. Too many startup programs can slow down boot times and consume system resources, increasing the likelihood of a BSOD. Use the Task Manager (Ctrl+Shift+Esc) to disable unnecessary startup programs.
- Clean up your hard drive: Regularly delete unnecessary files, especially large temporary files, to free up disk space and improve performance. Consider using disk cleanup utilities provided by Windows.
- Monitor system resources: Use the Task Manager to monitor CPU usage, memory usage, and disk I/O. High and sustained usage in any of these areas could indicate a problem that needs attention.
- Create a system restore point: Regularly create system restore points. This allows you to revert your system to a previous stable state if a problem occurs, potentially avoiding a BSOD altogether.
Implementing these best practices will create a more stable and resilient system, significantly reducing the chances of encountering future Blue Screens of Death. Remember that prevention is far better than cure when it comes to system stability.
When Professional Help is Needed
While many Blue Screen of Death (BSOD) issues can be resolved through troubleshooting steps you can perform yourself, some situations require the expertise of a qualified technician. Knowing when to seek professional help can save you time, frustration, and potentially costly data loss.
Sometimes, despite your best efforts, the underlying cause of the BSOD remains elusive. Complex hardware or software conflicts, driver issues beyond simple updates, or damage to critical system files often necessitate the intervention of a professional. They possess specialized tools and knowledge to diagnose and rectify these intricate problems.
Situations Requiring Professional Assistance
Professional assistance is strongly recommended when self-troubleshooting efforts consistently fail to resolve the BSOD issue. This is especially true if the error persists after attempting basic and advanced troubleshooting techniques, including memory and hard drive diagnostics. Consider seeking professional help if you experience recurring BSODs, data corruption, or system instability. Furthermore, if you are uncomfortable working directly with your computer’s hardware or software, professional help can ensure the process is handled safely and efficiently.
Gathering Information Before Contacting Support
Before contacting technical support, gathering relevant information will streamline the diagnostic process and expedite a solution. Providing the support team with comprehensive details will enable them to effectively assess the situation and offer targeted assistance. This collaborative approach ensures a quicker resolution to your BSOD problem.
- The exact error message displayed on the BSOD screen: Note the specific stop code (e.g., 0x0000007B) and any accompanying error descriptions. This crucial piece of information provides immediate clues to the root cause.
- Recent hardware or software changes: Detail any new hardware components installed, software applications added or updated, or driver installations prior to the onset of the BSOD. This helps identify potential conflicts or incompatibilities.
- Frequency and circumstances of the BSOD: Describe how often the BSOD occurs, under what conditions (e.g., during startup, under heavy load, or randomly), and any specific actions that trigger the error. This provides context for the issue’s timing and pattern.
- Your computer’s specifications: Provide details such as the operating system (Windows version), processor type and speed, RAM amount, and hard drive details. This allows the technician to better understand your system’s capabilities and limitations.
- Any error logs or event viewer entries: If possible, provide any error logs or entries from the Windows Event Viewer. These logs often contain detailed information about system errors and may pinpoint the source of the problem.