Understanding Data Deletion Methods
Completely removing data from a hard drive involves more than simply deleting files. Different methods offer varying levels of security and require different amounts of time. Understanding these differences is crucial for ensuring sensitive information remains unrecoverable.
Data Deletion Method Comparison
The process of removing data from a hard drive ranges from simple file deletion to sophisticated secure erasure techniques. Each method has its own strengths and weaknesses in terms of data recovery prevention and time consumption. Choosing the right method depends on the sensitivity of the data and the level of security required.
| Method | Description | Security Level | Time Required |
|---|---|---|---|
| Deleting Files | Files are moved to the Recycle Bin (Windows) or Trash (macOS), where they can be easily recovered. Even after emptying the Recycle Bin, data often remains on the hard drive until overwritten. | Low | Seconds to minutes |
| Formatting a Drive | This overwrites the file allocation table and directory structures, making it difficult to find files using standard methods. However, specialized data recovery software can often recover data after formatting. | Medium (depending on formatting method) | Minutes to hours (depending on drive size) |
| Secure Erase (e.g., using Windows’ built-in tools or third-party software) | This method overwrites the entire hard drive multiple times with random data, making data recovery virtually impossible. Different algorithms and overwrite passes offer varying levels of security. | High | Hours to days (depending on drive size and chosen algorithm) |
| Physical Destruction | The hard drive is physically destroyed, rendering the data completely unrecoverable. This can involve shredding, drilling, or other methods. | Highest | Minutes (depending on method) |
Limitations of Standard File Deletion and Recycle Bin
The Windows Recycle Bin and standard file deletion methods offer minimal protection against data recovery. When a file is deleted, it’s only marked as deleted in the file system; the actual data remains on the hard drive until overwritten. Data recovery software can easily retrieve this data, even after emptying the Recycle Bin. This makes these methods unsuitable for permanently removing sensitive information. For example, a deleted tax return might still be recoverable with specialized software even after emptying the recycle bin, posing a significant security risk.
Effectiveness and Time Requirements of Data Erasure Methods
The effectiveness of a data erasure method directly correlates with the time it takes to complete. Simple methods like deleting files are quick but offer little security. Secure erase methods, on the other hand, are significantly slower but provide a much higher level of data protection. For instance, a secure erase using the DoD 5220.22-M standard, which involves multiple overwrites, will take considerably longer than a single-pass overwrite, but it offers a significantly higher degree of assurance that data is unrecoverable. The choice of method involves a trade-off between speed and security. For highly sensitive data, the extra time investment in a more secure method is generally worthwhile.
Windows 10 Built-in Tools for Secure Erasure
Windows 10 offers a built-in tool, “Reset this PC,” designed to refresh or completely reinstall the operating system. While primarily intended for troubleshooting, this feature can also be utilized for secure data erasure, although its effectiveness depends on the chosen option. Understanding its capabilities and limitations is crucial for ensuring complete data removal.
This section details the functionality of the “Reset this PC” feature, outlining its different options and associated risks. We will also provide a step-by-step guide to using this tool.
Reset this PC Functionality and Data Impact
The “Reset this PC” feature provides two primary options: “Keep my files” and “Remove everything.” “Keep my files” attempts to retain personal files while reinstalling Windows, essentially performing a system refresh. “Remove everything” completely wipes the hard drive, reinstalling Windows from scratch and effectively deleting all data. The degree of data security offered by each option varies significantly. “Keep my files” might leave traces of data, while “Remove everything” offers a more thorough, though not necessarily perfectly secure, erasure.
Comparison of “Keep my files” and “Remove everything” Options
The “Keep my files” option reinstalls Windows 10 while attempting to preserve user data. However, it doesn’t guarantee the complete removal of all system files and settings. Some residual data might remain, potentially recoverable with specialized data recovery tools. Conversely, the “Remove everything” option performs a more thorough system reset, deleting all user data, applications, and system files before reinstalling Windows. This provides a significantly higher level of data security, though complete data destruction isn’t guaranteed without additional measures.
Limitations and Potential Risks of Using Built-in Windows 10 Tools
While “Reset this PC” with the “Remove everything” option offers a relatively secure method of data erasure, it’s not foolproof. Sophisticated data recovery techniques might still be able to retrieve some data fragments. Furthermore, the process’s effectiveness depends on the type of hard drive used. Solid-state drives (SSDs) might require more extensive erasure methods than traditional hard disk drives (HDDs) due to their data management techniques. It’s also important to note that this feature does not erase data from external drives connected to the computer during the reset process.
Step-by-Step Guide to Using “Reset this PC”
The following steps Artikel the process of using the “Reset this PC” feature in Windows 10. It’s recommended to back up any essential data before proceeding, even if choosing the “Remove everything” option.
- Open the Settings app (Windows key + I).
- Click on “Update & Security”.
- Select “Recovery” from the left-hand menu.
- Under “Reset this PC,” click “Get started”.
- Choose either “Keep my files” or “Remove everything,” carefully considering the implications of each option.
- Follow the on-screen instructions. The process may take a considerable amount of time, depending on the chosen option and the computer’s specifications.
- Once the process is complete, Windows 10 will be reinstalled.
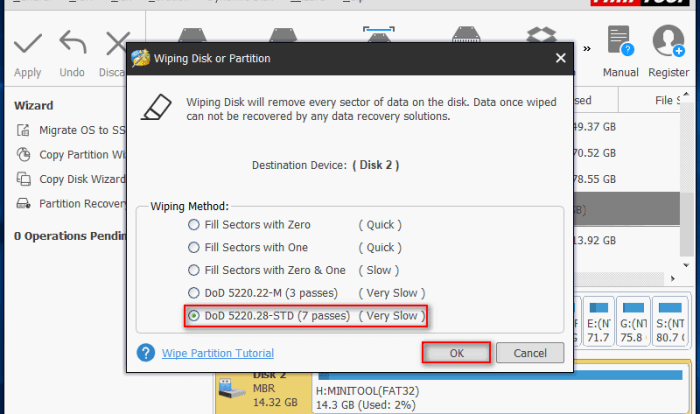
Third-Party Data Erasure Tools
While Windows offers built-in tools for secure data erasure, third-party applications often provide more advanced features and greater control over the wiping process. These tools can be particularly beneficial for users requiring a higher degree of certainty regarding data deletion or those needing to erase data from drives formatted with file systems not fully supported by Windows’ built-in tools.
Third-party data erasure tools offer several advantages over Windows’ built-in utilities. They frequently provide a wider range of erasure methods, allowing for customized levels of security based on the sensitivity of the data. Many offer more detailed reporting and verification capabilities, providing confirmation that the data has been irrecoverably erased. Furthermore, some third-party tools support a broader range of storage devices and file systems, extending their usability beyond what Windows natively offers. However, using third-party software also introduces potential drawbacks. The selection of a reputable vendor is crucial to avoid malicious software. Additionally, the user interface and functionality can vary significantly between different applications, requiring a learning curve for users unfamiliar with the software. Finally, the cost of these applications should be considered, as many are commercial products.
Reputable Third-Party Data Erasure Software Examples
Several reputable third-party applications offer secure hard drive wiping capabilities. Examples include DBAN (Darik’s Boot and Nuke), a free, open-source tool known for its thoroughness and ease of use; Blancco Drive Eraser, a commercial product used by many organizations for its comprehensive features and audit capabilities; and Eraser, another free and open-source tool that integrates well with Windows and allows for scheduled data erasure tasks. These are but a few of the many options available, and the best choice depends on individual needs and technical expertise.
Comparison of Third-Party Data Erasure Applications
The following table compares three popular third-party data erasure applications based on their features, security level, and cost. Note that security levels are subjective and depend on the chosen erasure method and the specific implementation within each application. The “Cost” column reflects typical pricing at the time of writing and is subject to change.
| Software Name | Features | Security Level | Cost |
|---|---|---|---|
| DBAN (Darik’s Boot and Nuke) | Bootable, supports various drives and file systems, multiple erasure methods (e.g., DoD 5220.22-M, Gutmann), simple interface. | High (depending on chosen method) | Free (open-source) |
| Blancco Drive Eraser | Comprehensive reporting, audit trails, supports various drives and file systems, multiple erasure methods, advanced features for enterprise use. | Very High | Commercial (pricing varies by license) |
| Eraser | Secure file deletion, scheduled erasures, integrates with Windows Explorer, multiple erasure methods. | High (depending on chosen method) | Free (open-source) |
Physical Hard Drive Destruction
When all else fails, and the absolute certainty of data eradication is paramount, physical destruction of the hard drive becomes the most reliable method. This involves physically damaging the drive to render the data irretrievable, surpassing the limitations of software-based deletion techniques. It’s a final, irreversible step, ensuring no trace of data remains.
Physical destruction methods offer varying degrees of effectiveness and require careful consideration of environmental impact. The choice of method depends on the level of security required and the resources available.
Methods of Physical Hard Drive Destruction
Several methods can be employed to physically destroy a hard drive. These range from relatively simple techniques accessible to individuals to more sophisticated processes typically used by data destruction specialists. Each method offers a different level of assurance regarding data recovery.
- Drilling: This involves using a drill to create multiple holes through the platters of the hard drive, effectively destroying the data storage surfaces. This is a relatively straightforward method, but it requires caution to avoid injury. The drill bits should be appropriately sized to penetrate the drive casing and platters.
- Shredding: Industrial-grade shredders are designed to pulverize hard drives, reducing them to small, unidentifiable pieces. This method is highly effective in ensuring complete data destruction and is often preferred for large-scale data disposal. The resulting fragments are virtually impossible to reassemble.
- Degaussing: A degausser uses a powerful magnetic field to erase the data on a hard drive’s magnetic platters. While effective for magnetic media, it may not completely destroy all data, and some advanced recovery techniques might still yield some information. This method is often used as a pre-processing step before physical destruction.
Environmental Considerations and Responsible Disposal
The disposal of physically destroyed hard drives requires careful consideration of environmental regulations. Simply discarding the remnants in the trash is not advisable due to the potential for hazardous materials within the drive, such as heavy metals. Responsible disposal involves adhering to local and national regulations regarding electronic waste (e-waste). This might include recycling programs specifically designed for hard drives or partnering with certified e-waste recyclers. Many municipalities offer e-waste collection centers or events where residents can safely dispose of electronic devices.
Visual Representation of Hard Drive Drilling
Imagine a standard 3.5-inch hard drive lying flat. A power drill, fitted with a 1/4-inch high-speed steel drill bit, is positioned directly over the center of the drive’s top surface. The drill is then activated, and the bit slowly penetrates the metal casing, the plastic components, and finally the magnetic platters within. Multiple holes are created, ensuring the disruption of all data tracks on the platters. The resulting damage is irreversible, rendering the data unrecoverable. The drive is now significantly damaged, with numerous holes visible on its surface. The process leaves behind a visibly destroyed hard drive, clearly unusable.
Data Recovery Considerations
Completely erasing data from a hard drive doesn’t guarantee absolute, unrecoverable deletion in all cases. The success of data recovery after a drive wipe depends heavily on the method used and several other factors. Understanding these limitations is crucial for ensuring data security.
Data recovery after a hard drive wipe is possible, though the likelihood and difficulty vary significantly depending on the method employed. Methods like a simple delete operation leave data highly vulnerable, while more sophisticated techniques, such as multiple overwrites or specialized erasure tools, dramatically reduce the chances of recovery. However, no method offers a 100% guarantee of irretrievability, particularly in the hands of a determined and well-equipped professional.
Factors Influencing Data Recovery Success
Several factors influence the success of data recovery attempts after a hard drive wipe. These include the type of erasure method used, the number of overwrites performed, the drive’s physical condition, and the expertise of the data recovery specialist. For example, a single overwrite might be easily reversed by sophisticated data recovery software, while multiple passes using different patterns make recovery increasingly difficult. A physically damaged drive, however, might make recovery impossible regardless of the erasure method.
Limitations of Data Recovery Techniques
The effectiveness of data recovery techniques varies depending on the erasure method used. Simple deletion leaves data intact on the drive, making recovery straightforward. However, methods involving multiple overwrites significantly increase the difficulty and cost of recovery. Specialized tools that employ cryptographic techniques or physically alter the drive’s surface can make recovery practically impossible with standard methods. While some advanced techniques might still yield fragmented data remnants, the effort and expense often outweigh the value of the recovered information.
Best Practices to Prevent Data Recovery
To minimize the risk of data recovery after secure erasure, several best practices should be followed. These include using a robust erasure tool that performs multiple passes with varying patterns, verifying the erasure process’s completion, and physically destroying the drive after erasure if maximum security is required. The use of certified data destruction services offers the highest assurance of data irretrievability. Furthermore, ensuring the drive is properly degaussed (for magnetic drives) or physically destroyed (for SSDs and HDDs) adds another layer of protection against sophisticated recovery attempts. For sensitive data, considering professional data destruction services is strongly recommended.