Defining the Budget and Goals
Building a gaming PC involves careful consideration of your budget and desired performance. Understanding these two factors is crucial for making informed decisions about components and ensuring you get the best possible gaming experience for your investment. This section Artikels realistic budget ranges and corresponding gaming goals to help guide your PC build.
Choosing the right budget and gaming goals is the foundation of your PC build. A well-defined plan ensures you spend your money wisely and achieve your desired performance levels. Without a clear understanding of your needs, you risk overspending on unnecessary components or underperforming in key areas.
Budget Ranges and Gaming Goals
We’ll define three realistic budget ranges for a gaming PC: low, mid, and high. Each range is associated with different gaming goals, reflecting varying levels of graphical fidelity and performance expectations. These goals are not strictly limiting; they provide a framework for understanding the capabilities of each budget tier.
| Budget | Goal | Expected Performance | Potential Bottlenecks |
|---|---|---|---|
| Low ($700 – $1000) | 1080p gaming at high settings (60fps+) | Smooth gameplay at 1080p resolution with most modern titles at high or medium settings. Expect occasional dips below 60fps in more demanding games. | CPU may become a bottleneck in more demanding games. GPU might struggle with higher resolutions or settings. Storage speed (using a traditional HDD) can impact loading times. |
| Mid ($1200 – $1800) | 1440p gaming at high settings (60-144fps) | Smooth gameplay at 1440p resolution with most modern titles at high settings, often achieving frame rates above 60fps and potentially exceeding 144fps on high refresh rate monitors. | GPU could be a bottleneck if aiming for very high frame rates at 1440p. A less powerful CPU might still impact performance in CPU-bound games. |
| High ($2000+) | 4K gaming at high settings (60fps+) or 1440p high refresh rate gaming (144fps+) or VR gaming | Smooth gameplay at 4K resolution with high settings in most titles, or consistently high frame rates (144fps+) at 1440p. High-end VR gaming experiences with minimal performance issues. | High-end components are generally required to avoid bottlenecks, but even then, some very demanding games may still require compromises in settings to achieve desired frame rates. A lack of sufficient cooling could also be a bottleneck. |
Choosing Essential Components
Building a gaming PC hinges on selecting the right components. The performance and overall experience are directly tied to the quality and specifications of these key parts. Choosing wisely within your budget is crucial for a satisfying gaming experience. This section details the five most critical components and provides specifications across three budget tiers: budget-friendly, mid-range, and high-end.
Essential Components and Their Importance
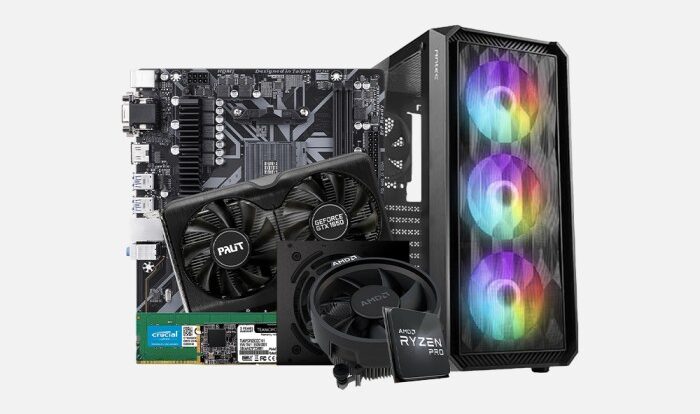
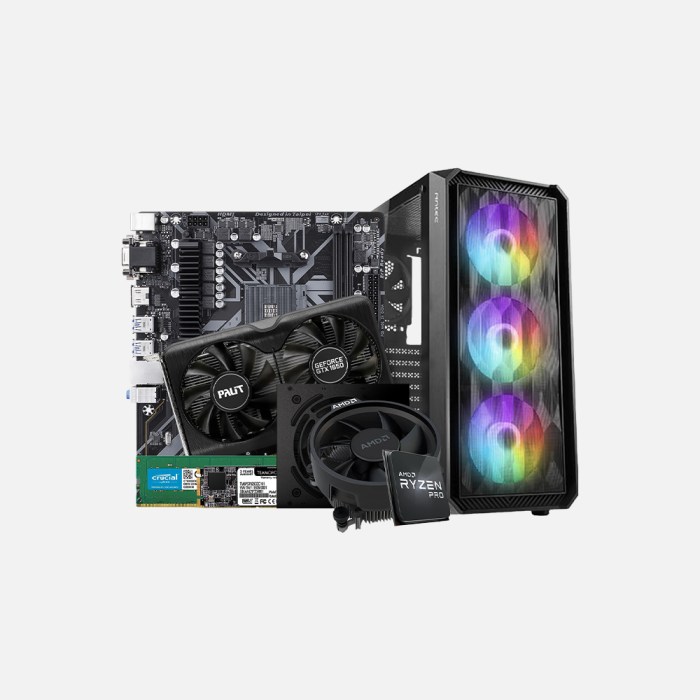
Five components form the core of any gaming PC: the CPU (Central Processing Unit), GPU (Graphics Processing Unit), RAM (Random Access Memory), Motherboard, and Storage (SSD or HDD). Each plays a vital role in the system’s overall performance. The CPU handles the game’s calculations and logic, the GPU renders the graphics, RAM provides temporary storage for active processes, the motherboard connects everything, and storage holds the operating system and games.
CPU Specifications Across Budget Ranges
The CPU is the brain of your system. A powerful CPU ensures smooth gameplay, especially in demanding titles.
| Budget Range | CPU Suggestion | Clock Speed (GHz) | Cores/Threads | Considerations |
|---|---|---|---|---|
| Budget-Friendly | AMD Ryzen 5 5600G or Intel Core i5-12400 | 3.9-4.6 GHz (AMD) / 2.5-4.4 GHz (Intel) | 6/12 (AMD) / 6/12 (Intel) | Integrated graphics are a plus for budget builds, offering decent performance for less demanding games. |
| Mid-Range | AMD Ryzen 5 7600X or Intel Core i5-13600K | 4.7-5.3 GHz (AMD) / 3.5-5.1 GHz (Intel) | 6/12 (AMD) / 14/20 (Intel) | Excellent balance of price and performance, suitable for 1080p and 1440p gaming. |
| High-End | AMD Ryzen 7 7700X or Intel Core i7-13700K | 4.5-5.4 GHz (AMD) / 3.4-5.4 GHz (Intel) | 8/16 (AMD) / 16/24 (Intel) | Top-tier performance for high refresh rate gaming at 1440p and 4K. |
GPU Specifications Across Budget Ranges
The GPU is responsible for rendering the visuals. A powerful GPU is crucial for high frame rates and detailed graphics.
| Budget Range | GPU Suggestion | Memory (GB) | Considerations |
|---|---|---|---|
| Budget-Friendly | AMD Radeon RX 6600 or NVIDIA GeForce RTX 3050 | 8 GB | Suitable for 1080p gaming at medium to high settings. |
| Mid-Range | AMD Radeon RX 6700 XT or NVIDIA GeForce RTX 3060 Ti | 12 GB | Excellent performance at 1080p and 1440p, capable of high settings and high refresh rates. |
| High-End | AMD Radeon RX 7800 XT or NVIDIA GeForce RTX 4070 | 16 GB | High-end performance for 1440p and 4K gaming at maximum settings. |
RAM Specifications Across Budget Ranges
RAM is short-term memory; more RAM means smoother multitasking and better performance in demanding games.
| Budget Range | RAM Suggestion | Speed (MHz) | Capacity (GB) | Considerations |
|---|---|---|---|---|
| Budget-Friendly | 16GB DDR4-3200 | 3200 | 16 | Sufficient for most games, but might bottleneck in future. |
| Mid-Range | 16GB DDR5-5600 | 5600 | 16 | Faster speeds improve performance; 16GB is a good sweet spot. |
| High-End | 32GB DDR5-6000 | 6000 | 32 | Future-proofs your system and allows for smoother multitasking and higher resolution textures. |
Motherboard and Storage Considerations
The motherboard should be compatible with your chosen CPU and RAM. For storage, a fast NVMe SSD is highly recommended for faster loading times. The choice of motherboard chipset and SSD type (NVMe PCIe 4.0 or 3.0) will depend on your CPU and budget. A 1TB SSD is a good starting point for most users.
Selecting Peripheral Devices
Building a great gaming PC isn’t just about the internal components; the peripherals you choose significantly impact your gaming experience. A high-end PC paired with low-quality peripherals will feel underwhelming, while a well-balanced system, including carefully selected peripherals, enhances overall performance and enjoyment. This section focuses on choosing a monitor, keyboard, and mouse to complement your newly built gaming PC, considering different budget levels.
Monitor Selection
The monitor is arguably the most crucial peripheral for gaming. Resolution, refresh rate, and response time are key factors influencing visual quality and responsiveness. Higher resolutions offer sharper images, while higher refresh rates provide smoother gameplay, and lower response times minimize input lag. Let’s explore suitable options across three budget ranges: Budget (under $200), Mid-range ($200-$400), and High-end (over $400).
Budget options typically offer 1080p resolution with a 60Hz refresh rate and a response time around 5ms. Mid-range monitors often step up to 1440p resolution, 144Hz refresh rates, and response times under 1ms. High-end monitors might feature 4K resolution, 240Hz refresh rates, and incredibly fast response times (under 0.5ms), along with features like HDR support and G-Sync/FreeSync compatibility.
Keyboard Selection
Your choice of keyboard directly affects your in-game control and comfort during extended gaming sessions. Mechanical keyboards, known for their durability and responsiveness, are popular among gamers, though membrane keyboards offer a more budget-friendly alternative. Consider factors like key switches (linear, tactile, clicky), build quality, and additional features like RGB lighting and macro keys.
Budget keyboards usually consist of membrane keyboards offering basic functionality. Mid-range options often include mechanical keyboards with standard switches and durable construction. High-end keyboards might incorporate premium switches, advanced features like hot-swappable sockets, and sophisticated RGB lighting effects.
Mouse Selection
The mouse is your primary input device for navigating and interacting within the game world. Factors like sensor type, DPI (dots per inch), button layout, and ergonomics play a significant role in performance and comfort. Consider your grip style (palm, claw, fingertip) when selecting a mouse.
Budget mice generally use optical sensors with lower DPIs and fewer programmable buttons. Mid-range mice typically offer higher DPI optical or laser sensors, more programmable buttons, and improved ergonomics. High-end mice may feature advanced sensors with exceptionally high DPIs, lightweight designs, and customizable weight adjustments.
Monitor Specifications Comparison
The following table compares different monitor specifications across various price points, illustrating the trade-offs between resolution, refresh rate, and response time.
| Resolution | Refresh Rate (Hz) | Response Time (ms) | Approximate Price Range |
|---|---|---|---|
| 1080p (1920×1080) | 60 | 5-8 | Under $200 |
| 1440p (2560×1440) | 144 | 1-2 | $200-$400 |
| 4K (3840×2160) | 144-240 | 0.5-1 | Over $400 |
Building the PC
Assembling your gaming PC can seem daunting, but with a methodical approach and careful attention to detail, it’s a rewarding experience. This section provides a step-by-step guide to building your PC, along with troubleshooting tips for common issues. Remember to ground yourself to prevent static electricity damage to components.
The process involves carefully installing each component into the case, ensuring proper connections and avoiding any physical damage. Taking your time and referring to your motherboard and component manuals will be invaluable throughout this process.
Preparing the Workspace and Components
Before beginning assembly, prepare a clean, well-lit workspace. Lay down an anti-static mat to protect your components from electrostatic discharge (ESD). Organize all your components – CPU, cooler, motherboard, RAM, storage drives (SSD/HDD), graphics card, power supply, and case – and have your tools ready: a Phillips head screwdriver, possibly a case standoffs, and zip ties for cable management.
Inspect each component for any physical damage before installation. Refer to your component manuals for specific instructions and diagrams if needed. Take photos as you progress, this can be very helpful if you encounter issues.
Installing the CPU and Cooler
Carefully remove the CPU’s protective cover. Align the CPU with the socket on the motherboard, ensuring the arrow markings align correctly. Gently lower the CPU into the socket and close the lever or latch. Apply thermal paste to the CPU (if not pre-applied to the cooler). Secure the cooler according to the manufacturer’s instructions, ensuring proper contact with the CPU. A poorly installed cooler can lead to overheating and system instability.
Image: A close-up showing the CPU being carefully lowered into the motherboard socket, with arrows indicating proper alignment. The image also shows the latch being secured. A second image would show the cooler being mounted on the CPU, with thermal paste visible.
Installing RAM
Open the clips on the RAM slots on the motherboard. Align the RAM stick with the notch and slot, and push firmly until the clips snap into place. Ensure that each RAM stick is properly seated. Incorrectly installed RAM will prevent the system from booting.
Image: A clear image showing the RAM stick being inserted into the slot, with the clips clearly visible before and after installation. Another image might show the proper orientation of the RAM stick in the slot.
Mounting the Motherboard
Carefully place the motherboard into the case, aligning the standoffs with the corresponding holes. Secure the motherboard with screws. Avoid over-tightening the screws, which could damage the motherboard. Connect the front panel connectors (power button, reset button, USB, audio) to the appropriate headers on the motherboard. Refer to your motherboard manual for the correct pinouts.
Image: A picture showing the motherboard being carefully placed onto the case standoffs, followed by an image showing the motherboard securely mounted with screws.
Installing Storage Devices (SSD/HDD)
Install your SSDs and HDDs into their designated bays within the case. Secure them with screws. Connect the SATA data cables and power cables to the drives and the motherboard/power supply respectively. Ensure that the cables are securely connected.
Image: Images showing SSD and HDD installation into their respective bays, with SATA and power cables connected securely.
Installing the Graphics Card
Open the expansion slot on the case and carefully insert the graphics card into the PCIe slot on the motherboard. Press firmly until it clicks into place. Secure it with a retaining bracket if necessary.
Image: A clear image showing the graphics card being inserted into the PCIe slot, followed by an image showing the card securely installed.
Connecting and Installing the Power Supply
Place the power supply into its bay and secure it with screws. Connect the necessary power cables to the motherboard, graphics card, storage devices, and other components. Ensure that all power connections are secure. A loose connection could lead to system instability or component damage.
Image: The power supply being installed in the case, followed by an image showcasing the various power cables connected to their respective components.
Connecting the Case Fans and Front Panel I/O
Install case fans, connecting their power cables to the motherboard or power supply. Connect the front panel I/O connectors (power, reset, USB, audio) to the motherboard’s corresponding headers. Refer to your motherboard and case manuals for proper connections.
Image: An image depicting the installation of case fans and the connection of front panel I/O connectors to the motherboard.
Troubleshooting Common Issues
If your PC doesn’t boot, check all connections, ensure the power supply is correctly connected and turned on, and verify that the RAM is properly seated. If the system boots but displays errors, check your BIOS settings and component manuals for troubleshooting information. Overheating can be caused by insufficient cooling, improperly applied thermal paste, or dust buildup. Ensure proper airflow within the case.
PC Build Checklist
Before powering on your newly built PC, review this checklist to ensure everything is correctly installed and connected:
- CPU installed and cooler secured
- RAM installed and seated properly
- Motherboard securely mounted
- Storage devices installed and connected
- Graphics card installed and secured
- Power supply installed and connected
- Case fans installed and connected
- Front panel I/O connected
Software and Optimization
Having built your dream gaming PC, the next crucial step is installing and optimizing the necessary software for peak performance. This involves selecting the right operating system, installing essential drivers, and configuring various settings to enhance your gaming experience. Proper software installation and optimization are key to unlocking the full potential of your hardware investment.
This section details the essential software required for a gaming PC and Artikels the steps for installation and configuration. We will also explore effective methods for optimizing your system for optimal gaming performance, ensuring smooth gameplay and high frame rates.
Essential Software Installation
Installing the correct software is the foundation for a smoothly running gaming PC. This begins with the operating system, followed by the installation of crucial drivers for your graphics card and other components. Failure to properly install and update drivers can lead to performance issues, instability, and even crashes.
First, you’ll need to install the operating system, typically Windows 10 or 11. This involves booting from the installation media (USB drive or DVD) and following the on-screen instructions. After the OS is installed, you should immediately connect to the internet to download and install the latest Windows updates. This ensures you have the latest security patches and performance improvements. Next, install the drivers for your graphics card (Nvidia GeForce Experience or AMD Adrenalin Software) which are crucial for optimal graphics performance. These drivers often include game-specific optimizations and control panel features to fine-tune settings. Finally, update drivers for your motherboard, sound card, and other peripherals for a completely optimized system. These drivers are usually found on the manufacturer’s websites.
Optimizing for Gaming Performance
Optimizing your PC for gaming involves several steps that can significantly improve your frame rates and overall gaming experience. These steps range from in-game settings adjustments to system-level tweaks.
In-game settings adjustments are often the most impactful. Lowering settings such as shadows, anti-aliasing, and texture quality can dramatically improve performance, especially on less powerful systems. Experimentation is key to finding the optimal balance between visual fidelity and frame rate. For example, reducing shadow quality from “Ultra” to “Medium” might result in a significant performance boost without noticeably impacting visual quality. Beyond in-game settings, consider adjusting your Windows power plan to “High Performance” to maximize CPU and GPU utilization. This setting allows your components to operate at their maximum potential, resulting in higher frame rates. Additionally, closing unnecessary background applications during gameplay frees up system resources, leading to smoother performance. Consider using resource monitors to identify and close applications consuming excessive resources.
Background Processes Management
Managing background processes is critical for optimizing gaming performance. Numerous applications and services run in the background, consuming system resources and potentially impacting game performance.
Before launching a game, close unnecessary applications such as web browsers, email clients, and streaming services. These applications consume significant processing power and memory, reducing resources available to your game. Using the Task Manager (Ctrl+Shift+Esc) in Windows allows you to identify and terminate resource-intensive processes. Furthermore, consider disabling startup programs that are not essential for your system’s operation. Many applications automatically start when Windows boots, consuming resources even before you begin gaming. Disabling unnecessary startup programs reduces the initial system load and frees up resources for gaming.
Testing and Benchmarking
After building your gaming PC, rigorous testing and benchmarking are crucial to ensure it performs as expected and meets your gaming goals. This process involves running various tests and analyzing the results to identify any bottlenecks or areas for improvement. Benchmarking allows for a quantifiable assessment of your PC’s capabilities compared to other systems and established performance standards.
Benchmarking provides valuable insights into your PC’s performance across different aspects. It helps determine if the chosen components are working optimally together and if the system meets the anticipated performance level based on the budget allocated. Furthermore, benchmarking can highlight potential issues, such as thermal throttling or driver conflicts, that might not be apparent during regular use.
Benchmarking Methods
Several methods exist for testing your gaming PC’s performance. These range from simple in-game frame rate monitoring to comprehensive synthetic benchmarks that stress various hardware components. Popular game-based benchmarks include recording frame rates (FPS) and average frame times during gameplay. Synthetic benchmarks, such as those offered by 3DMark, offer standardized tests for evaluating GPU and CPU performance independently. Monitoring CPU and GPU temperatures and utilization during these tests helps identify potential thermal limitations. Tools like MSI Afterburner and HWMonitor can be utilized to gather this data. The data obtained should be recorded and analyzed to determine performance strengths and weaknesses.
Interpreting Benchmark Results
Interpreting benchmark results requires understanding what the various metrics represent. For example, higher FPS generally indicates smoother gameplay, but it’s crucial to consider frame time consistency. Consistent frame times result in a more fluid and less stuttery experience. Benchmark scores are relative; comparing your results to published benchmarks for similar systems helps assess your PC’s performance relative to expectations. Consider analyzing the minimum, average, and maximum FPS values in benchmarks, not just the average. The minimum FPS value often represents the bottleneck of the system. Looking at CPU and GPU utilization helps determine which component is limiting performance. If the CPU is consistently at 100% usage, it indicates a CPU bottleneck, and similarly, a GPU consistently at 100% suggests a GPU bottleneck.
Benchmark Results Across Budget Ranges
The following table shows example benchmark results for different games across three hypothetical budget ranges (Low, Medium, High). Note that these are illustrative examples and actual results will vary depending on specific components, game settings, and drivers.
| Game | Low Budget (FPS Average) | Medium Budget (FPS Average) | High Budget (FPS Average) |
|---|---|---|---|
| Cyberpunk 2077 (1080p, Low Settings) | 30 | 45 | 60 |
| Cyberpunk 2077 (1080p, High Settings) | 20 | 35 | 55 |
| Red Dead Redemption 2 (1080p, Low Settings) | 35 | 50 | 70 |
| Red Dead Redemption 2 (1080p, High Settings) | 25 | 40 | 65 |
| Fortnite (1080p, Epic Settings) | 75 | 100 | 144 |
Future-Proofing Considerations
Building a gaming PC is an investment, and while no system lasts forever, thoughtful component choices can significantly extend its lifespan and reduce the need for frequent, costly upgrades. Future-proofing isn’t about building a system that will never need updating; it’s about making smart decisions to delay those upgrades as long as possible.
The goal of future-proofing is to maximize the longevity of your gaming PC by selecting components that age gracefully and allow for relatively easy upgrades when necessary. This involves understanding which components are most susceptible to obsolescence and choosing those with sufficient headroom to handle future gaming demands and technological advancements.
Component Lifespans and Upgrade Paths
The rate at which components become outdated varies considerably. Some, like the CPU and GPU, tend to show their age more quickly than others. Understanding these differences allows for strategic planning to mitigate the impact of obsolescence.
- Graphics Card (GPU): GPUs are typically the first component to show its age, due to rapid advancements in graphics technology. Upgrading involves purchasing a newer, more powerful graphics card. This often requires checking compatibility with your existing power supply and motherboard. For example, a user might upgrade from an RTX 3060 to an RTX 4070, gaining significant performance improvements.
- Central Processing Unit (CPU): CPUs also experience generational improvements, but their lifespan is generally longer than GPUs. Upgrading a CPU often requires a new motherboard and potentially RAM, depending on socket compatibility. A user might upgrade from an Intel i5-12400 to an Intel i5-13600K, experiencing performance gains in both gaming and general computing tasks.
- Motherboard: Motherboards are usually upgraded alongside the CPU. Choosing a motherboard with a widely supported socket type and sufficient expansion slots can prolong its useful life. For instance, a motherboard with a high-end chipset and plentiful PCIe slots will offer more upgrade opportunities in the future.
- Random Access Memory (RAM): RAM technology evolves more slowly than CPUs or GPUs. While faster RAM speeds become available, the upgrade path is relatively straightforward, often involving simply replacing existing RAM modules with higher capacity and speed modules of the same type. Upgrading from 16GB DDR4 to 32GB DDR4 is a common and relatively inexpensive upgrade.
- Storage (SSD/HDD): While the technology continues to evolve (e.g., NVMe drives becoming faster), storage is generally a less pressing concern for future-proofing. Adding more storage is easier and cheaper than upgrading other components. A user might add a larger SSD to supplement their existing drive, addressing storage needs without replacing the entire system.
- Power Supply Unit (PSU): PSUs generally have a longer lifespan than other components. However, choosing a PSU with higher wattage than initially needed allows for future upgrades of power-hungry components like GPUs, without needing to replace the PSU itself. For example, a 750W PSU could comfortably support a high-end GPU upgrade in the future.