Understanding Blue Screen Errors (BSODs)
Blue Screen of Death (BSOD) errors, also known as system crashes, are critical errors that force Windows to shut down unexpectedly. Understanding their causes is crucial for effective troubleshooting and preventing future occurrences. These errors are typically caused by hardware or software issues, and identifying the root cause requires systematic investigation.
Types of BSOD Stop Codes and Potential Causes
Stop codes are alphanumeric codes displayed on the BSOD screen, providing clues about the error’s origin. Each code represents a specific type of system failure. For example, `0x0000007B` (INACCESSIBLE_BOOT_DEVICE) often indicates a problem with the hard drive or its connection, while `0x00000050` (PAGE_FAULT_IN_NONPAGED_AREA) frequently points to driver issues or corrupted system files. Other common codes include `0x00000024` (NTFS_FILE_SYSTEM) related to hard drive file system errors, and `0x000000A5` (THREAD_STUCK_IN_DEVICE_DRIVER) often indicating a problem with a device driver. The specific cause often needs further investigation using tools like event viewer and debugging utilities.
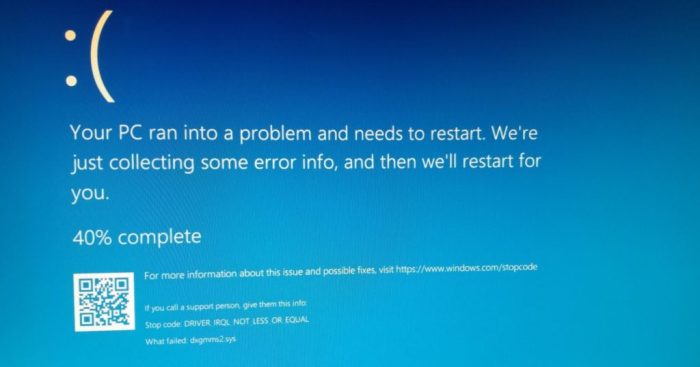
Information Displayed on a Typical BSOD Screen
A typical BSOD displays several key pieces of information. This includes the stop code (as mentioned above), a brief description of the error, and a technical description which may be difficult to interpret without specialized knowledge. Crucially, it also lists the involved driver (if applicable) and a list of loaded files. This information is vital for pinpointing the source of the problem. The system might also display technical information like the error parameters which provide deeper insight into the error’s context. Analyzing this information systematically is a critical step in troubleshooting.
Common Hardware Components Contributing to BSODs
Several hardware components are frequent culprits in BSODs. Faulty RAM is a common cause, often leading to memory errors. Problems with the hard drive, such as failing sectors or loose connections, can also trigger BSODs. Overheating components, especially the CPU and GPU, can also lead to system instability and crashes. A failing power supply unit (PSU) may not provide sufficient power, resulting in unpredictable behavior and BSODs. Finally, issues with the motherboard itself, such as failing capacitors or damaged traces, can also cause these errors.
Troubleshooting Steps for a BSOD
The following flowchart Artikels a systematic approach to troubleshooting BSODs. This process involves a series of checks and actions to identify and resolve the underlying issue.
| Step | Action | Expected Outcome | Next Step |
|---|---|---|---|
| 1 | Note the Stop Code and other details from the BSOD. | Identify the potential cause based on the error code. | 2 |
| 2 | Check for recent hardware or software changes. | Identify potential culprits introduced recently. | 3 |
| 3 | Run a memory test (e.g., Windows Memory Diagnostic). | Identify if RAM is faulty. | 4 |
| 4 | Check hard drive health using a tool like CrystalDiskInfo. | Assess the physical health of the hard drive. | 5 |
| 5 | Check system temperatures using monitoring software. | Identify if overheating is a problem. | 6 |
| 6 | Update or roll back drivers, especially graphics and storage drivers. | Resolve driver conflicts or issues. | 7 |
| 7 | Perform a system restore to a previous stable point. | Revert to a point before the BSOD started occurring. | 8 |
| 8 | Reinstall Windows as a last resort. | Resolve deep-seated system corruption. | Problem Solved |
Advanced Hardware Diagnostics
Identifying the root cause of complex PC hardware problems and persistent blue screen errors often requires a deep dive into advanced hardware diagnostics. This process involves systematically testing individual components to pinpoint the malfunctioning part. This section details the methodologies and tools necessary for effective hardware troubleshooting.
Memory Testing with Specialized Software
Thorough memory testing is crucial for identifying RAM issues that might manifest as system instability or BSODs. Specialized software offers more comprehensive testing capabilities than built-in Windows tools. Popular options include MemTest86+, a bootable memory diagnostic tool, and Windows Memory Diagnostic, accessible through the Windows operating system. MemTest86+ provides a rigorous test, running for several passes to detect even intermittent errors. Windows Memory Diagnostic offers a less intensive test but is convenient for users who prefer not to boot from a separate media. Both tools generate reports indicating the presence of errors and their location in memory. The interpretation of these reports is straightforward; any errors reported indicate faulty RAM modules requiring replacement.
Comparison of Memory Testing Methodologies
Several methodologies exist for memory testing, each with its strengths and weaknesses. MemTest86+, for example, utilizes a comprehensive suite of algorithms to stress RAM under various conditions, identifying both hard and soft errors. In contrast, the Windows Memory Diagnostic employs a less extensive test suite, focusing on identifying readily apparent issues. While MemTest86+ is more thorough and often reveals subtle errors that might be missed by other tools, it requires creating a bootable USB drive and restarting the computer, whereas the Windows tool is more readily available but may not be as comprehensive. The choice of methodology depends on the user’s technical expertise and the level of detail required.
Hard Drive Diagnostic Tools
Identifying failing hard drives is critical as they can lead to data loss and system crashes. Manufacturer-specific diagnostic tools, such as SeaTools for Seagate drives or Data Lifeguard Diagnostic for Western Digital drives, provide detailed scans and analysis of the drive’s health. These tools check for bad sectors, read/write errors, and other potential problems. Additionally, third-party tools like CrystalDiskInfo offer a simpler, less technical way to monitor hard drive health and identify potential issues. These tools present a wealth of information about the drive, such as SMART (Self-Monitoring, Analysis and Reporting Technology) data, providing insights into drive health parameters such as temperature, power-on hours, and error rates.
Interpreting Hard Drive Diagnostic Scan Results
Interpreting the results from a hard drive diagnostic scan requires understanding the reported metrics. SMART data, for instance, includes attributes like “Reallocated Sector Count,” which indicates the number of bad sectors that have been remapped to good sectors. A high value here suggests a failing drive. Similarly, “Pending Sector Count” indicates sectors that are likely to fail soon. High values for these parameters warrant immediate attention, suggesting data backup and drive replacement are necessary. The tools typically provide a clear indication of the drive’s overall health, often using color-coded indicators (green for good, yellow for caution, red for critical).
Testing the CPU and Associated Components
Testing the CPU and its associated components (such as the cooler and motherboard) requires a multifaceted approach. While there isn’t a single definitive test, monitoring CPU temperature during stress tests using tools like Prime95 or OCCT can identify potential overheating issues. High temperatures indicate problems with the CPU cooler or insufficient airflow within the case. Monitoring CPU usage and clock speeds can reveal performance bottlenecks or instability, possibly indicating a CPU fault or related component failure. Additionally, checking the motherboard for any visible damage or signs of overheating is crucial. Observing system stability under load, combined with temperature and usage monitoring, is key to identifying issues with the CPU and associated components.
Troubleshooting Peripheral Issues
Peripheral devices, while seemingly simple, can be significant sources of PC instability and performance bottlenecks. Addressing issues with these components often requires a systematic approach, combining visual inspection with software diagnostics. This section details common problems and effective troubleshooting strategies for various peripherals.
Malfunctioning Graphics Cards
Graphics card problems manifest in various ways, from display artifacts (visual glitches) and screen tearing to complete display failure or system crashes. Identifying the root cause often involves checking for physical damage, such as bent pins or loose connections. Software-based troubleshooting involves updating or reinstalling drivers, checking for overheating (using monitoring software and ensuring adequate cooling), and verifying compatibility with the system’s power supply. If the problem persists after these steps, the graphics card may require replacement. For instance, a sudden display of horizontal lines across the screen, accompanied by system instability, strongly suggests a failing graphics card.
Troubleshooting Connectivity Issues with External Devices
Connectivity problems with external devices—printers, scanners, external hard drives—often stem from incorrect cable connections, driver issues, or power supply problems. Begin by visually inspecting all cables and connections, ensuring they are firmly seated. Then, try different ports and cables to rule out faulty hardware. If the device is still not recognized, check the Device Manager in Windows for error messages or missing drivers. Installing the correct drivers from the manufacturer’s website usually resolves the issue. For example, a printer failing to print after a recent Windows update might be solved by installing the latest printer drivers.
Diagnosing and Resolving Problems with USB Ports and Other Expansion Slots
USB port malfunctions can range from the inability to detect devices to slow transfer speeds or intermittent connectivity. First, try different USB ports to isolate the problem. If the issue is with a specific port, it may be faulty and require repair or motherboard replacement. Slow transfer speeds might indicate a power supply problem, especially with power-hungry devices. For expansion slots (PCIe, etc.), ensure the card is properly seated and that the slot itself isn’t physically damaged. Try reseating the card, and if the problem persists, test with a different card in the same slot. A USB port consistently failing to power a device, despite other ports working correctly, points to a hardware fault within that specific USB port controller.
Troubleshooting Network Interface Cards (NICs)
Network connectivity issues can be frustrating. Start by checking the physical connection of the NIC cable, ensuring it’s securely plugged into both the computer and the network device (router, modem). Then, check the network settings in the operating system, verifying that the NIC is enabled and has the correct IP address and DNS settings. If the NIC is not detected, check the Device Manager for driver issues or hardware conflicts. Reinstalling or updating the NIC driver often resolves the problem. For wireless NICs, check the wireless signal strength and try moving closer to the router. A persistent inability to connect to the internet despite having correct network settings suggests a driver issue or hardware failure of the NIC.
Comparison of Troubleshooting Techniques
| Peripheral Device | Initial Troubleshooting Steps | Intermediate Steps | Advanced Steps |
|---|---|---|---|
| Graphics Card | Check connections, inspect for physical damage | Update/reinstall drivers, check temperatures | Test with a different card, consider replacement |
| External Hard Drive | Check connections, try different ports/cables | Check disk management for errors, run CHKDSK | Test on another computer, data recovery |
| USB Devices | Try different ports, try different cables | Check Device Manager for errors, check power supply | Test device on another computer, consider hardware failure |
| Network Interface Card (NIC) | Check cable connections, check network settings | Update/reinstall drivers, check for IP address conflicts | Test with a different NIC, consider hardware failure |
BIOS and UEFI Settings
The BIOS (Basic Input/Output System) or UEFI (Unified Extensible Firmware Interface) is the fundamental firmware that initializes your computer’s hardware components before the operating system loads. Understanding and correctly configuring its settings is crucial for optimal system performance and stability. Incorrect settings can lead to boot failures, hardware malfunctions, and overall system instability.
BIOS/UEFI settings directly control how your computer interacts with its hardware. They manage boot order, CPU frequency and voltage, memory timing, storage device configurations, and various other hardware-related parameters. These settings are essential for ensuring all components work together seamlessly.
BIOS/UEFI Settings that Can Cause System Instability
Improperly configured BIOS/UEFI settings can significantly impact system stability. Overclocking the CPU or RAM without proper cooling or insufficient voltage can lead to system crashes and blue screen errors. Incorrect boot order settings can prevent the system from booting from the correct drive. Disabling essential features, such as virtualization or secure boot, can also create problems depending on the operating system and software being used. Incorrectly setting the SATA mode can cause problems with hard drive or SSD recognition.
Accessing and Navigating the BIOS/UEFI Interface
Accessing the BIOS/UEFI interface varies depending on the motherboard manufacturer and model. Generally, you need to press a specific key (often Delete, F2, F10, F12, or Esc) repeatedly during the initial boot sequence, before the operating system logo appears. The exact key is usually displayed briefly on the screen during startup. Once inside, navigation typically involves using the arrow keys to move between menus and options, and the Enter key to select or confirm choices. Most modern UEFI interfaces offer a graphical user interface (GUI) that is more intuitive than the older text-based BIOS interfaces. However, some manufacturers still use text-based interfaces, requiring more familiarity with BIOS commands and settings.
Resetting the BIOS/UEFI to Default Settings
Resetting the BIOS/UEFI to its default settings is a useful troubleshooting step if you’ve made changes that caused instability. The method for doing this varies between manufacturers, but often involves finding an option labeled “Load Optimized Defaults,” “Load Setup Defaults,” or similar. Some motherboards may have a physical jumper or CMOS battery on the motherboard itself that, when manipulated according to the motherboard’s manual, will reset the BIOS settings. This is usually a last resort and should only be done if other methods fail. Be aware that resetting to defaults will erase any custom settings you’ve made, including overclocking profiles.
Safely Updating the BIOS/UEFI Firmware
Updating the BIOS/UEFI firmware can improve system stability, add new features, or resolve compatibility issues. However, it’s a critical process and should be approached cautiously. Always download the latest BIOS/UEFI update from the motherboard manufacturer’s website, ensuring it’s specifically compatible with your motherboard model. The update process is usually done through a utility provided by the manufacturer, often run from within the BIOS/UEFI interface itself or from a bootable USB drive. During the update, it’s crucial to avoid power interruptions, as this could permanently damage the motherboard. Read the manufacturer’s instructions carefully before proceeding, as the process varies. A power failure during a BIOS update can render the system completely unusable. Therefore, ensure a stable power supply and uninterrupted power during the entire update process.
Driver Management and Updates

Device drivers are the crucial software components that allow your operating system to communicate with your hardware. A stable system relies heavily on correctly functioning drivers; outdated, corrupted, or conflicting drivers are frequent culprits behind blue screen errors and other system instability. Effective driver management is therefore essential for maintaining a healthy and responsive PC.
Driver issues manifest in various ways, from intermittent system freezes and unexpected shutdowns to specific hardware malfunctions. Understanding how to identify, update, and manage drivers is a critical skill for advanced troubleshooting.
Identifying Outdated or Corrupted Drivers
Identifying problematic drivers often requires a combination of methods. The Device Manager, accessible through the Windows Control Panel, provides a list of all connected devices and their associated drivers. Yellow exclamation marks next to a device indicate a driver problem. Furthermore, using a third-party driver update utility can scan your system and compare your installed drivers against a comprehensive database of the latest versions. These utilities often highlight outdated drivers and offer automated updates. Finally, regularly checking the manufacturer’s website for updated drivers for your specific hardware components is a proactive approach to preventing issues.
Uninstalling and Reinstalling Drivers
Uninstalling and reinstalling a driver is a common troubleshooting step for resolving driver-related problems. In the Device Manager, right-click on the problematic device and select “Uninstall device.” Windows will then prompt you to confirm the uninstallation. After the uninstallation, restart your computer. Windows will often automatically reinstall the driver during the boot process. If it doesn’t, you can manually reinstall the driver from the manufacturer’s website or from a previously saved driver installation file. This clean reinstall can resolve conflicts or corruption within the driver files.
Updating Drivers from the Manufacturer’s Website
This method ensures you obtain the most reliable and up-to-date drivers. First, identify the exact model of the hardware component requiring the update (e.g., the specific model number of your graphics card). Then, navigate to the manufacturer’s support website (e.g., NVIDIA, AMD, Intel). Use their search function to find the drivers for your specific hardware model and operating system. Download the appropriate driver package. Once downloaded, run the installer, following the on-screen instructions. Restart your computer after the installation is complete to allow the changes to take effect. Remember to always download drivers from official manufacturer websites to avoid malware or incompatible drivers.
Best Practices for Driver Management
Regularly checking for driver updates is crucial for system stability. Scheduling automated driver scans using a reputable third-party utility can streamline this process. Before installing any driver update, it’s recommended to create a system restore point. This allows you to revert to a previous system state if the new driver causes problems. Always back up your important data before significant system changes, including driver updates. Finally, maintaining a record of your driver versions can be helpful for troubleshooting later. This could involve keeping a text file or using a dedicated driver management utility that keeps a log of installed drivers.
System Restore and Reinstallation
System Restore and a clean operating system installation are powerful tools for resolving persistent PC problems, but they require careful consideration and preparation. Understanding the process and potential pitfalls of each method is crucial for successful troubleshooting. Data backup is paramount before undertaking either procedure.
System Restore uses previously saved system snapshots to revert your computer to a point in time before the issue occurred. This is a less disruptive method than reinstalling the operating system, but it won’t resolve problems caused by corrupted system files that predate the restore point. A clean installation, on the other hand, completely wipes your hard drive and installs a fresh copy of the operating system, effectively resolving many deep-seated issues but requiring a complete data backup beforehand.
Using System Restore
System Restore allows you to undo recent system changes, returning your computer to a previous stable state. To initiate System Restore, search for “Create a restore point” in the Windows search bar. Select “System Restore” from the options. Choose a restore point from the list of available dates and times. Review the details and confirm your selection. The system will then reboot and apply the changes. The process typically takes a few minutes, but longer times are possible depending on the size of the restore point and system performance.
Performing a Clean Installation of the Operating System
A clean installation of Windows involves formatting the hard drive and installing a fresh copy of the operating system. This is a more involved process but effectively resolves many persistent issues. Before beginning, ensure you have a valid Windows installation media (USB or DVD) and a complete backup of your important data. Boot from the installation media, follow the on-screen instructions to format the hard drive and install the operating system. After installation, you’ll need to reinstall drivers and applications. This process can take several hours, depending on your hardware and internet connection speed.
The Importance of Data Backup
Backing up your data before performing either System Restore or a clean installation is absolutely crucial. System Restore might not always be successful, and a clean installation will erase everything on your hard drive. Consider using external hard drives, cloud storage services, or dedicated backup software to create a complete and reliable backup of your files, documents, photos, and other important data. Regularly scheduled backups are recommended to prevent data loss from unforeseen circumstances. For example, imagine losing years of family photos due to a failed hard drive—a good backup strategy would have prevented this catastrophic loss.
Troubleshooting Issues After System Restore
If problems persist after a System Restore, the restore point may not have addressed the root cause. Further troubleshooting steps, such as checking for malware, updating drivers, or examining hardware issues, may be necessary. It’s also possible the selected restore point itself was already corrupted. In such cases, a clean installation may be the next logical step.
Preparing for a Clean Operating System Installation
Before undertaking a clean installation, a checklist is essential to ensure a smooth transition.
- Back up all important data to an external drive or cloud storage.
- Obtain a valid Windows installation media (USB or DVD).
- Note down product keys for your software.
- Download drivers for your hardware components from the manufacturer’s website.
- Create a list of installed applications to reinstall after the clean install.
Following this checklist will minimize disruptions and ensure a successful clean installation.
Advanced Power Management and Overclocking
Power management and overclocking are crucial aspects of PC optimization, impacting both system stability and performance. Proper power settings can significantly extend component lifespan and reduce energy consumption, while overclocking pushes hardware beyond its factory settings to achieve higher performance, albeit with inherent risks. Understanding the interplay between these two elements is vital for advanced troubleshooting and maximizing PC potential.
Power settings directly influence the balance between performance and energy efficiency. Aggressive power schemes prioritize performance, leading to higher clock speeds and increased power draw, which can generate more heat and potentially reduce component longevity. Conversely, power-saving modes prioritize lower energy consumption, often resulting in reduced performance. Finding the optimal balance depends on individual needs and hardware capabilities. For instance, a gaming PC might benefit from a high-performance power plan, while a workstation used primarily for office tasks might be better served by a balanced or power-saving plan.
Impact of Power Settings on System Stability and Performance
Power settings affect system stability primarily through their influence on voltage and clock speeds. Insufficient power supply under heavy load, often a consequence of aggressive power plans without adequate cooling, can lead to instability and system crashes. Conversely, excessively conservative power settings might limit performance unnecessarily. Monitoring system temperatures and power consumption is crucial to identify potential stability issues related to power management. For example, if a CPU consistently reaches critical temperatures under a high-performance power plan, reducing the plan’s aggressiveness or improving cooling is necessary.
Risks and Benefits of CPU and GPU Overclocking
Overclocking involves increasing the clock speed of a CPU or GPU beyond its factory specifications. This increases processing power, leading to noticeable performance gains in tasks like gaming and video editing. However, it comes with risks. Increased clock speeds generate more heat, potentially leading to component damage if not properly managed. Furthermore, overclocking can introduce instability, resulting in system crashes, blue screen errors, and data loss. The benefits are improved performance, but the risks include hardware damage and system instability. A successful overclock allows users to experience significantly faster frame rates in games or quicker rendering times in professional applications. However, an unstable overclock can lead to frequent crashes, data corruption, and even permanent hardware damage. A careful and measured approach is essential.
Monitoring System Temperatures and Voltages During Overclocking
Monitoring system temperatures and voltages is paramount during overclocking. Specialized software like HWMonitor, Core Temp, or MSI Afterburner provides real-time data on CPU and GPU temperatures, voltages, and clock speeds. Keeping an eye on these metrics allows for early detection of potential problems, such as overheating or voltage instability, preventing component damage. For example, exceeding the CPU’s thermal threshold (often 90-100°C depending on the model) can lead to thermal throttling or permanent damage. Similarly, excessive voltage can damage the CPU or GPU.
Best Practices for Safely Overclocking Hardware Components
Safe overclocking involves a gradual and iterative process. Start with small increments in clock speed and voltage, thoroughly testing stability at each step. Use stress testing software like Prime95 or FurMark to push the hardware to its limits and identify any instability. Adequate cooling is crucial; ensure your CPU and GPU have sufficient airflow. Proper case ventilation and potentially additional cooling solutions (like aftermarket coolers) are often necessary for stable overclocks. Finally, always monitor temperatures and voltages to prevent overheating or voltage spikes.
Creating a Stable Overclocking Profile
Creating a stable overclocking profile involves incremental adjustments and thorough testing. Begin by increasing the CPU or GPU clock speed by a small percentage (e.g., 5-10%). Run a stress test for at least an hour to check for stability. If the system is stable, increase the clock speed further, repeating the stress test. If instability occurs (crashes, errors, artifacts), reduce the clock speed until stability is restored. Adjust voltage only if necessary, starting with small increments. Document each step and the results to track progress and identify the optimal settings for a stable overclock. Remember that each CPU and GPU is unique, and the optimal overclock will vary. The process is iterative, requiring patience and careful monitoring.