Identifying Complex Hardware Issues
Troubleshooting complex PC hardware problems requires a systematic approach. Understanding common symptoms associated with failing components is crucial for efficient diagnosis and repair. This section details diagnostic steps for identifying the source of various hardware malfunctions, focusing on scenarios such as random restarts and intermittent errors.
Common Symptoms of Failing Hardware Components
Failing hardware often manifests through a range of noticeable symptoms. These symptoms can be subtle or dramatic, depending on the severity of the failure and the component affected. For instance, a failing hard drive might produce clicking noises, while a failing power supply might lead to complete system shutdowns. Careful observation of these symptoms is the first step in pinpointing the problem.
Diagnostic Steps for Random Restarts
Random restarts are a common symptom of several underlying hardware issues. A systematic approach is needed to isolate the cause. First, check the system’s event logs for error messages that might indicate a specific hardware failure. Next, run memory diagnostics (like Memtest86) to rule out RAM problems. Then, monitor system temperatures using monitoring software to detect overheating components, such as the CPU or GPU. If these initial steps don’t reveal the culprit, consider testing the power supply with a multimeter to ensure it’s delivering stable voltage. Finally, reseating components like RAM modules and graphics cards can sometimes resolve loose connections causing intermittent issues.
Isolating the Source of Intermittent Hardware Errors
Intermittent errors are notoriously difficult to diagnose because they don’t occur consistently. A useful strategy is to systematically stress-test individual components. For example, run a demanding benchmark test on the GPU to see if it leads to errors. Similarly, running a memory-intensive application for an extended period can help identify RAM problems. If the errors only occur under specific load conditions, this can help narrow down the list of potential faulty components. Documenting the conditions under which the errors occur is vital for effective troubleshooting.
Comparison of Hardware Failure Symptoms
| Component | Symptoms | Additional Notes | Diagnostic Steps |
|---|---|---|---|
| CPU | System freezes, crashes, blue screen errors (BSODs), unusually high CPU temperatures | Often accompanied by system instability under heavy load. | Check CPU temperature, run stress tests, check for CPU errors in event logs. |
| GPU | Graphical artifacts (visual glitches), screen tearing, system crashes during gaming or graphically intensive tasks, unusually high GPU temperatures | Artifacts can range from simple flickering to complete screen corruption. | Check GPU temperature, run 3D benchmarks, test with different displays. |
| RAM | Random crashes, system instability, BSODs, memory errors reported by the operating system | Errors can be intermittent and difficult to pinpoint. | Run memory diagnostic tools (Memtest86), check RAM modules for physical damage. |
| Motherboard | System won’t boot, POST errors, beeps during startup, inconsistent behavior, overheating in specific areas of the board | Motherboard failures can manifest in a variety of ways. | Inspect the motherboard for any visible damage, check for proper seating of all components, test with known good components. |
Advanced BIOS/UEFI Troubleshooting
Accessing and manipulating the BIOS/UEFI is crucial for advanced PC hardware troubleshooting. A thorough understanding of its settings and potential errors is essential for resolving complex boot issues and optimizing system performance. This section details the process of navigating BIOS/UEFI settings, explains key settings, and discusses common errors.
Accessing BIOS/UEFI Settings
The method for accessing BIOS/UEFI settings varies depending on the motherboard manufacturer. Generally, you need to press a specific key (or key combination) repeatedly during the initial boot-up process, before the operating system loads. Common keys include Delete, F2, F10, F12, and Esc. The specific key is usually displayed briefly on screen during startup; consult your motherboard manual if unsure. For example, ASUS motherboards often use the Delete key, while some Gigabyte boards might use F12. Once inside, navigation usually involves arrow keys, Enter to select, and Esc or F10 to save and exit.
Key BIOS/UEFI Settings for Troubleshooting
Several BIOS/UEFI settings directly impact hardware functionality and troubleshooting. Understanding their roles is critical.
- Boot Order: This setting determines the order in which the system attempts to boot from various devices (hard drive, CD/DVD, USB). Incorrect boot order is a common cause of boot failures. If your system isn’t booting from the expected drive, check and adjust this setting.
- Boot Mode (UEFI/Legacy): UEFI (Unified Extensible Firmware Interface) is the modern standard, offering better security and support for larger hard drives. Legacy BIOS is older technology. Incompatibility between the boot mode and the boot drive can prevent booting. Ensure the boot mode matches your operating system and storage devices.
- SATA Configuration: This setting controls how the motherboard interacts with SATA hard drives and SSDs. Incorrect settings (like AHCI vs. IDE mode) can prevent the system from recognizing drives. Match the SATA configuration to your operating system’s requirements.
- CPU Settings (Clock Speed, Voltage): Overclocking can cause instability, leading to boot failures. If you’ve overclocked your CPU, try resetting these settings to their defaults. Similarly, incorrect voltage settings can also lead to instability.
- Memory Settings (XMP Profile, Frequency, Timings): Similar to CPU settings, incorrect memory settings (especially overclocking) can prevent booting. If you’ve changed memory settings, reset them to defaults or disable XMP profiles to see if this resolves the problem.
Common BIOS/UEFI Errors and Causes
Several errors can appear within the BIOS/UEFI environment, indicating underlying hardware or configuration issues.
- “Boot Device Not Found”: This indicates the system can’t find a bootable device (hard drive, SSD, USB drive) in the configured boot order. Check boot order settings and ensure the bootable device is connected and detected.
- “CMOS Checksum Error”: This often points to a problem with the CMOS (Complementary Metal-Oxide-Semiconductor) battery, which stores BIOS settings. Replacing the battery might resolve this. Data corruption in the CMOS settings can also trigger this error.
- POST Errors (Beep Codes): Many motherboards use beep codes to signal hardware problems during POST (Power-On Self-Test). Consult your motherboard manual to decipher the beep code sequence to diagnose the failing component.
- Overheating Errors: If the CPU or other components are overheating, the BIOS might display an error message or shut down the system. Check CPU and case fan operation and ensure adequate cooling.
Troubleshooting a System That Won’t Boot Past POST
The following flowchart illustrates the troubleshooting process:
[Imagine a flowchart here. It would start with “System won’t boot past POST?” Then branch to “Check for visual signs of damage (burnt components, loose connections)?” Yes leads to “Repair/Replace damaged components,” No leads to “Listen for beep codes and consult motherboard manual.” That would branch to “Identify failing component and replace,” or “Check power supply (voltage, connections).” That would branch to “Replace power supply,” or “Check RAM modules (reseat, test individually).” That would branch to “Replace RAM,” or “Check boot order in BIOS/UEFI.” That would branch to “Correct boot order,” or “Check hard drive/SSD connections.” That would branch to “Reconnect/Replace drive,” or “Check BIOS/UEFI settings (defaults).” That would branch to “Reset BIOS/UEFI,” or “Try a different boot device (USB drive with OS installer).” That would branch to “Reinstall OS,” or “Seek professional help.”]
Memory Diagnostics and Repair
Diagnosing and resolving memory issues is crucial for maintaining a stable and efficient PC. Faulty RAM can lead to system crashes, blue screen errors, and data corruption. This section details how to effectively diagnose and repair memory problems.
Identifying the source of memory problems requires a methodical approach, starting with built-in diagnostic tools and progressing to more advanced stress tests. Accurate interpretation of diagnostic results is key to implementing the correct solution, whether it’s reseating modules or replacing faulty components.
Using Windows Memory Diagnostic
Windows Memory Diagnostic is a built-in tool that allows for thorough testing of your system’s RAM. To initiate a memory test, search for “Windows Memory Diagnostic” in the Windows search bar. You will have the option to restart your computer immediately and run the test, or schedule it for the next restart. The test will run automatically upon reboot. The diagnostic process involves a series of memory tests, checking for errors and reporting the results upon completion. Upon restarting, you will see a progress bar indicating the test’s progress. After the test completes, check the results displayed on the screen or view a log file to identify any errors.
Interpreting Memory Diagnostic Results
The Windows Memory Diagnostic tool reports results indicating whether errors were found. A clean report signifies that the RAM passed the tests and is likely functioning correctly. However, error reports provide specific codes that pinpoint the location and type of memory error. For example, an error might indicate a problem with a specific RAM module or a particular memory address. These error codes are typically accompanied by descriptions clarifying the nature of the problem, such as “hardware failure,” “corrupted data,” or “parity errors.” Understanding these codes is vital in determining the appropriate corrective action. If errors are found, consult your motherboard’s manual for details on interpreting the specific error codes displayed.
RAM Stability Testing Methods
Beyond Windows’ built-in tool, several third-party applications offer more comprehensive RAM stress tests. These programs push your RAM to its limits, revealing potential stability issues that might not be apparent under normal operating conditions. Popular options include MemTest86 and Prime95. These tools perform extensive tests over a prolonged period, simulating heavy memory usage to identify even subtle errors. Running these tests for several hours, or even overnight, often reveals intermittent problems that might otherwise go unnoticed. A successful stress test, without errors, strongly suggests your RAM is stable and functioning correctly.
Solutions for Memory-Related Errors
If memory errors are detected, several troubleshooting steps can be taken.
The following actions are recommended before considering replacing RAM modules:
- Reseat RAM Modules: Carefully remove and reinsert each RAM module into its slot. Ensure the modules are firmly seated and making proper contact. This simple step often resolves issues caused by loose connections.
- Check for Physical Damage: Inspect the RAM modules for any visible signs of damage, such as bent pins or physical cracks. Damaged modules will need to be replaced.
- Update BIOS/UEFI: An outdated BIOS/UEFI might have compatibility issues with your RAM. Check your motherboard manufacturer’s website for the latest BIOS/UEFI update.
- Check Motherboard Manual: Consult your motherboard’s documentation to ensure your RAM is compatible with your system’s specifications, particularly regarding speed and timings.
- Replace Faulty Modules: If all else fails, replace the faulty RAM module(s) with new, compatible ones. It is often advisable to replace all modules simultaneously to ensure uniform performance and stability.
Hard Drive and Storage Troubleshooting
Hard drive and storage device failures represent a significant challenge in PC maintenance. Understanding the various diagnostic methods and troubleshooting techniques is crucial for data recovery and system stability. This section will explore various diagnostic approaches, data recovery processes, drive cloning methods, and a comparison of different storage media types.
Diagnosing Hard Drive Failures
Diagnosing hard drive failures often involves a multi-pronged approach. One of the most valuable tools is SMART (Self-Monitoring, Analysis and Reporting Technology) data. SMART attributes provide real-time information on various hard drive parameters, such as temperature, read/write error rates, and power-on hours. Analyzing SMART data can reveal potential problems before a complete failure occurs. Software tools like CrystalDiskInfo provide easy-to-understand visualizations of this data, highlighting potential issues with clear warnings. Beyond SMART data, surface scans, performed by utilities such as chkdsk (for Windows) or fsck (for Linux), check for bad sectors on the hard drive. These scans identify areas where data cannot be reliably read or written, indicating potential hardware problems. A high number of bad sectors warrants replacement.
Data Recovery from a Failing Hard Drive
Data recovery from a failing hard drive requires caution and specialized tools. The first step is to immediately disconnect the drive to prevent further damage. Attempting to access data from a failing drive can exacerbate the issue and lead to irreversible data loss. Professional data recovery services utilize specialized cleanroom environments and advanced tools to recover data from severely damaged drives. These services often employ techniques like image cloning and low-level data recovery to retrieve as much data as possible. For less severe cases, data recovery software, like Recuva or PhotoRec, can be used to recover files from a drive showing signs of failure, though success is not guaranteed. It is crucial to avoid writing any new data to the failing drive during the recovery process.
Hard Drive Cloning
Cloning a hard drive involves creating an exact duplicate of the source drive’s contents and structure onto a target drive. This is frequently used for backups, upgrades, or system migration. Several software tools, such as Macrium Reflect or Clonezilla, facilitate this process. The cloning process involves several steps: selecting the source and destination drives, initiating the cloning process, and verifying the clone’s integrity after completion. It’s important to ensure the target drive has sufficient capacity to accommodate the source drive’s data. After cloning, the cloned drive can be used as a replacement or backup.
Comparison of Storage Media
Different storage media types offer varying performance characteristics and failure points. The following table compares HDDs, SSDs, and NVMe drives:
| Storage Type | Performance | Cost | Common Failure Points |
|---|---|---|---|
| HDD (Hard Disk Drive) | Relatively slow read/write speeds | Generally less expensive | Mechanical failures (head crashes, platter damage), read/write errors |
| SSD (Solid State Drive) | Significantly faster read/write speeds than HDDs | More expensive than HDDs | Wear leveling issues, controller failures, sudden power loss during write operations |
| NVMe (Non-Volatile Memory Express) | Fastest read/write speeds, utilizes PCIe interface | Most expensive | Controller failures, firmware issues, limited lifespan compared to HDDs but generally longer than SSDs |
Power Supply Unit (PSU) Diagnostics
The power supply unit (PSU) is the heart of your PC, providing the necessary power for all components. A failing PSU can manifest in various ways, leading to system instability or complete failure. Understanding how to diagnose PSU problems is crucial for effective troubleshooting.
Diagnosing PSU issues involves recognizing common symptoms, performing voltage tests, and understanding the PSU’s wattage requirements. Ignoring PSU problems can lead to damage to other components, so careful attention to these diagnostics is vital.
Common Symptoms of a Failing PSU
A failing PSU often exhibits several telltale signs. These symptoms can range from subtle performance issues to complete system shutdowns. Recognizing these symptoms is the first step towards identifying the problem.
For example, intermittent shutdowns, unexpected restarts, system instability under load (e.g., during gaming or demanding tasks), and beeping sounds from the system are common indicators. Additionally, observe if the PC fails to boot entirely, or if specific components like the graphics card seem to be malfunctioning intermittently. These could be symptoms of insufficient or fluctuating power delivery from the PSU.
Testing PSU Output Voltage with a Multimeter
A multimeter is an essential tool for verifying the PSU’s output voltage. This allows for a precise assessment of whether the PSU is delivering the correct voltage to the system components. Improper voltage can cause significant damage.
To test the PSU, you’ll need a multimeter set to DC voltage measurement. First, ensure the PSU is disconnected from the PC and the power cord is unplugged. Then, connect the multimeter probes to the appropriate PSU output rails (usually labeled +3.3V, +5V, and +12V). The readings should match the specified voltages on the PSU label. Significant deviations indicate a potential problem. For instance, if the +12V rail reads only 10V, it suggests a serious issue that needs addressing. Remember to always observe safety precautions during this process.
PSU Wattage and System Component Requirements
The wattage rating of a PSU indicates its maximum power output capacity. It’s crucial to select a PSU with sufficient wattage to meet the power demands of all system components. Underpowering your system can lead to instability, component damage, and premature failure.
To determine the required wattage, add up the power consumption of each component (CPU, GPU, motherboard, storage devices, etc.). Many online calculators can assist with this calculation. It’s generally recommended to choose a PSU with a higher wattage rating than the calculated total to account for future upgrades and ensure sufficient headroom for peak power demands. For example, a system with a high-end CPU and GPU might require a 750W or higher PSU, while a less demanding system might only need a 550W PSU. Always refer to the manufacturer’s specifications for each component to determine its power requirements accurately.
Safety Precautions When Working with a PSU
Working with a PSU involves handling high voltages, which can be dangerous. Therefore, several safety precautions are crucial.
Always disconnect the PSU from the power source before handling it. Avoid touching any internal components while the PSU is connected to power. Use an anti-static wrist strap to prevent static discharge, which could damage components. Ensure the work area is well-ventilated to prevent overheating. If unsure about any procedure, seek assistance from a qualified technician. Finally, always refer to the PSU manufacturer’s instructions and safety guidelines for specific precautions.
Peripheral Device Troubleshooting
Peripheral devices, while seemingly simple, can be significant sources of frustration when malfunctioning. Effective troubleshooting requires a systematic approach, isolating the problem to the device, its connection, or the system itself. This section details strategies for resolving common issues with various peripherals.
USB Device Troubleshooting
Troubleshooting USB device problems often involves checking the physical connection, device drivers, and power management settings. Begin by ensuring the USB cable is securely connected to both the device and the computer. Try different USB ports, including those directly on the motherboard (if available) rather than on a hub. If the device still doesn’t work, check the Device Manager (in Windows) for any error messages associated with the device. Outdated or corrupted drivers are common culprits; reinstalling or updating the drivers might resolve the issue. Finally, examine your computer’s power management settings to ensure that power isn’t being cut to the USB ports to save energy. This can prevent some devices from functioning correctly.
Network Connectivity Troubleshooting
Network connectivity issues can stem from problems with the network adapter, network cables, routers, or internet service provider (ISP). First, verify the physical connection: ensure the Ethernet cable is firmly plugged into both the computer and the router. Check the network adapter settings in your operating system’s network configuration panel. Make sure the adapter is enabled and configured correctly for your network type (e.g., Ethernet or Wi-Fi). Use the system’s built-in diagnostic tools to check for network adapter issues. These tools often identify problems like driver conflicts or hardware failures. If the problem persists, consider resetting the network adapter or reinstalling its drivers. Testing the network cable with another device can help determine if the cable itself is faulty. If the issue persists after checking the hardware and drivers, contact your ISP to rule out any problems on their end.
Display Device Troubleshooting
Display problems often involve the monitor, the video cable, and the graphics card. Begin by visually inspecting the connections: ensure the video cable (HDMI, DisplayPort, DVI, VGA) is securely connected to both the monitor and the computer. Try a different cable if possible. If the problem persists, check the monitor’s power supply and settings. Make sure the monitor is turned on and set to the correct input source. If the issue still remains, examine the computer’s display settings. Incorrect resolution or refresh rate settings can lead to display problems. Finally, check the graphics card in the Device Manager (Windows) for any errors. If there are driver issues or hardware failures detected, updating the graphics card drivers or replacing the graphics card may be necessary.
Common Peripheral Device Errors and Their Likely Causes
| Error | Device | Likely Cause | Troubleshooting Steps |
|---|---|---|---|
| Device not recognized | USB drive, printer | Faulty cable, driver issues, power problems | Try different ports, cables, and drivers; check power supply |
| Intermittent connection | Wireless mouse, keyboard | Low battery, interference, driver issues | Check batteries, move device closer to receiver, update drivers |
| No display | Monitor | Power issues, cable problems, incorrect input source | Check power cord and connections; try different cable and input source |
| Slow transfer speeds | External hard drive | USB version incompatibility, drive failure, cable issues | Try different USB ports and cables; check drive health; consider upgrading to a faster USB standard |
Overheating and Thermal Management
Maintaining optimal operating temperatures for your PC components is crucial for their longevity and performance. Overheating can lead to system instability, data corruption, and even permanent hardware damage. Effective thermal management ensures your system runs smoothly and reliably, preventing costly repairs or replacements.
Proper cooling prevents thermal throttling, a process where the CPU or GPU reduces its clock speed to prevent overheating. This significantly impacts performance, especially during demanding tasks like gaming or video editing. High temperatures also degrade components over time, shortening their lifespan.
System Temperature Monitoring
Several hardware monitoring tools provide real-time temperature readings for various components, including the CPU, GPU, motherboard, and hard drives. Popular options include HWMonitor, Core Temp, and MSI Afterburner. These utilities typically display temperatures in Celsius or Fahrenheit, allowing you to track the thermal performance of your system under different workloads. For example, HWMonitor displays sensor readings in a user-friendly interface, clearly indicating critical temperature thresholds. If temperatures exceed manufacturer-recommended limits, immediate action is necessary.
Overheating Issue Identification and Resolution
Identifying the source of overheating often involves a combination of observation and software monitoring. High temperatures consistently exceeding recommended limits indicate a problem. Common causes include insufficient airflow, dust accumulation, failing fans, and inadequate thermal paste application.
Cleaning fans and reapplying thermal paste are effective solutions for many overheating issues. Dust buildup restricts airflow, reducing cooling efficiency. Using compressed air to carefully clean fans and heatsinks is a simple yet highly effective method. Reapplying thermal paste ensures proper heat transfer between the CPU/GPU and the heatsink. This involves removing the old paste, applying a small amount of new thermal paste, and carefully mounting the heatsink. Improper application can lead to poor heat transfer and increased temperatures.
Custom Cooling Solution Design for High-Performance PCs
High-performance PCs, particularly those with overclocked components, often benefit from custom cooling solutions. These solutions can significantly improve cooling efficiency and allow for higher overclocking stability. Custom cooling solutions typically involve using a liquid cooling system (either an all-in-one (AIO) liquid cooler or a custom loop) or enhanced air cooling with multiple high-performance fans and radiators.
Designing a custom cooling solution requires careful planning and consideration of several factors. These include component heat output, case airflow, radiator size, pump selection, and tubing routing. A well-designed custom loop can maintain significantly lower temperatures than stock cooling solutions, enabling higher overclocks and improved system stability under heavy load. For example, a custom loop using a large radiator and multiple high-performance fans can effectively dissipate heat from a high-end CPU and GPU, maintaining optimal operating temperatures even during extended periods of intense use. However, custom loops require more technical expertise and initial investment compared to AIO coolers.
Advanced Driver Troubleshooting
Drivers are the essential software that allows your operating system to communicate with your hardware. Troubleshooting driver issues is a crucial step in resolving many complex PC hardware problems. Incorrectly installed, outdated, or conflicting drivers can lead to system instability, performance degradation, and hardware malfunctions. This section details effective strategies for identifying and resolving driver-related problems.
Driver conflicts arise when two or more drivers attempt to use the same system resources simultaneously, leading to errors and malfunctions. Symptoms include blue screen errors (BSODs), system crashes, hardware not functioning correctly, or general system instability. Identifying these conflicts requires a systematic approach.
Identifying and Resolving Driver Conflicts
Identifying driver conflicts often involves examining the Device Manager, looking for devices with yellow exclamation marks indicating problems, or reviewing system logs for error messages related to specific drivers. Resolving conflicts may involve uninstalling one or both conflicting drivers, restarting the system, and allowing Windows to automatically reinstall the drivers or installing updated drivers from the manufacturer’s website. In some cases, manually disabling a conflicting driver might temporarily resolve the issue, while in others, a clean installation of the operating system may be necessary. For example, if two graphics cards are installed with conflicting drivers, uninstalling the driver for one card might resolve the issue, allowing the other card to function properly.
Installing and Updating Drivers Correctly
The process of installing and updating drivers involves several steps to ensure stability and optimal performance. First, identify the specific hardware component requiring a driver update. Then, visit the manufacturer’s website to download the latest driver for that specific hardware and operating system. Ensure you download the correct driver version; downloading an incorrect driver can exacerbate existing problems. Before installing the new driver, it’s advisable to uninstall the old driver to avoid conflicts. After installation, restart your computer to allow the changes to take effect. Regularly checking for driver updates is recommended for maintaining optimal system performance and security. For instance, updating your graphics card driver might improve game performance or add support for new features.
Troubleshooting Device-Specific Driver Issues
Troubleshooting device-specific driver problems requires a tailored approach. Begin by identifying the problematic device using Device Manager. Then, check the device’s status and any error messages associated with it. Next, attempt to update the driver to the latest version from the manufacturer’s website. If the problem persists, try uninstalling the driver and restarting your computer, allowing Windows to automatically reinstall it. If this fails, consider rolling back to a previous driver version if one is available. In some cases, you may need to use a specialized driver update utility, but always exercise caution when using third-party tools. For example, a malfunctioning printer might require uninstalling and reinstalling its specific printer driver to resolve print errors.
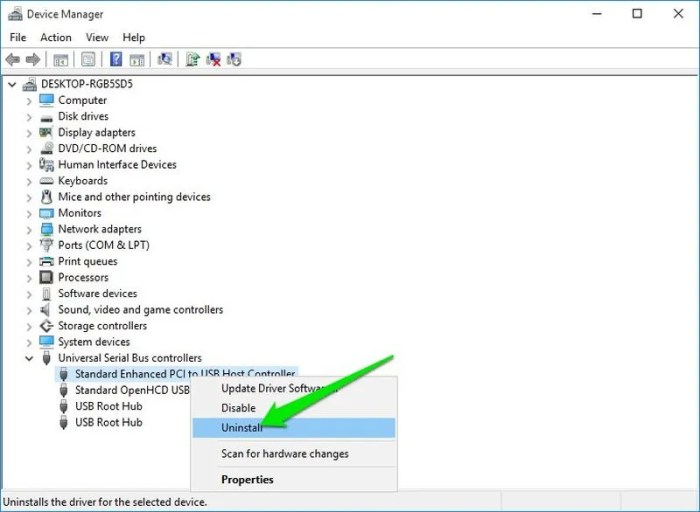
Using Device Manager to Troubleshoot Hardware Problems
Device Manager is a powerful Windows utility that provides a comprehensive view of all hardware connected to your computer and their associated drivers. It allows you to view the status of each device, update or uninstall drivers, roll back to previous driver versions, and troubleshoot hardware conflicts. Yellow exclamation marks or red crosses next to a device indicate problems. Right-clicking on a problematic device will provide options for troubleshooting, such as updating the driver, uninstalling the driver, or disabling the device. Using Device Manager effectively is a cornerstone of efficient hardware troubleshooting. For example, a USB device not working correctly might show a yellow exclamation mark in Device Manager, indicating a driver issue. Right-clicking on the device and selecting “Update driver” can often resolve the problem.