Understanding Blue Screen of Death (BSOD) Errors
The Blue Screen of Death (BSOD), also known as a stop error, is a critical system error in Windows that abruptly halts the operating system. These errors often indicate serious hardware or software problems requiring immediate attention. Understanding the information presented on the BSOD screen is crucial for effective troubleshooting.
Types of BSOD Stop Codes and Their Causes
BSODs display a stop code, a hexadecimal number, along with other details. This code helps pinpoint the source of the problem. For example, a `0x0000007B` (INACCESSIBLE_BOOT_DEVICE) code usually suggests a problem with the hard drive or its connection, while `0x000000A` (IRQL_NOT_LESS_OR_EQUAL) often points to a driver issue. Many stop codes exist, each indicating a specific failure point within the operating system. The accompanying error message, if present, can provide further clues. Unfortunately, there isn’t a simple one-to-one mapping between codes and solutions; the root cause can vary significantly even with the same code.
Information Displayed on a BSOD Screen
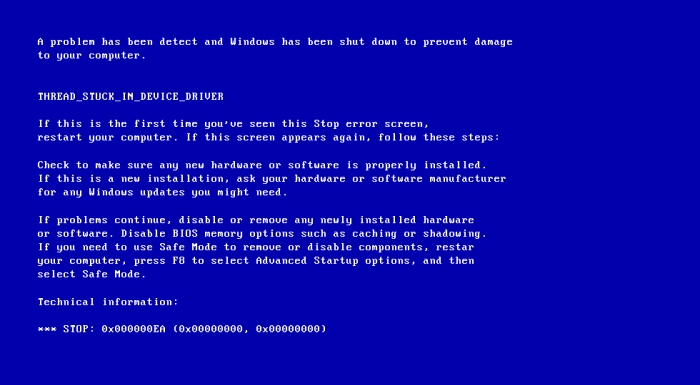
A typical BSOD displays several pieces of information. Besides the stop code, it often includes a brief description of the error, a technical explanation (sometimes cryptic), and a list of involved files or drivers. Crucially, it might show the name of the faulting driver, which helps significantly in isolating the problem. The “Parameters” section contains hexadecimal values that provide additional context for developers or advanced users. While the technical details might be overwhelming for a casual user, the stop code and faulting driver are the most important parts for initial troubleshooting.
Recording BSOD Error Information
Quickly recording the BSOD information is vital. Since the screen disappears quickly, taking a picture with a phone is often the easiest method. Alternatively, if possible, carefully note down the stop code, the error description, and the names of any mentioned drivers or files. If the system restarts automatically, adjusting the system settings to prevent automatic restarts can help you obtain the information. This usually involves modifying advanced boot options within the system settings. This allows you to manually examine the BSOD.
Common BSOD Error Codes, Causes, and Troubleshooting Steps
| Stop Code | Likely Cause | Initial Troubleshooting Steps | Additional Notes |
|---|---|---|---|
| 0x0000007B (INACCESSIBLE_BOOT_DEVICE) | Hard drive failure, loose cable, incorrect boot order, corrupted boot sector | Check hard drive connections, run CHKDSK, check boot order in BIOS | Consider data recovery if hard drive failure is suspected. |
| 0x0000007F (UNEXPECTED_KERNEL_MODE_TRAP) | Faulty hardware, driver issues, corrupted system files | Check hardware (RAM, CPU), update drivers, run System File Checker (SFC) | This code is often difficult to diagnose; further investigation might require advanced tools. |
| 0x000000ED (PAGE_FAULT_IN_NONPAGED_AREA) | Faulty drivers, corrupted system memory, hardware failure | Update drivers, run memory diagnostics (Windows Memory Diagnostic), check hardware | Memory errors can be intermittent and difficult to pinpoint. |
| 0xC000021A (STATUS_SYSTEM_PROCESS_TERMINATED) | Corrupted system files, incompatible software, driver issues | Run System File Checker (SFC), boot into Safe Mode, uninstall recently installed software | This usually indicates a serious system corruption. |
Hardware Diagnostics and Identification
Troubleshooting a Blue Screen of Death (BSOD) often requires investigating the hardware. Several components are common culprits, and a systematic approach to testing is crucial for efficient diagnosis. This section details methods for identifying problematic hardware.
Identifying potential hardware components frequently causing BSODs involves understanding their roles in system stability. Faulty or failing hardware can trigger system crashes manifested as BSODs.
RAM Integrity Testing
Memory (RAM) errors are a frequent cause of BSODs. Testing RAM integrity involves verifying its ability to correctly store and retrieve data. Windows includes a built-in memory diagnostic tool, and several third-party utilities offer more comprehensive testing.
Windows Memory Diagnostic is accessible from the Windows Start Menu by searching for “Windows Memory Diagnostic”. This tool can perform a quick test or a more thorough scan, restarting the system to begin the diagnostic process. Results are displayed upon the next boot. Third-party utilities, such as MemTest86+, offer more extensive testing capabilities, often running from a bootable USB drive or CD. These utilities can detect subtle memory errors that might not be found by Windows’ built-in tool. The choice between using the Windows tool or a third-party option depends on the depth of analysis required and the user’s comfort level with using command-line interfaces or external tools.
CPU Temperature Monitoring and Overheating Detection
The Central Processing Unit (CPU) generates heat during operation. Excessive heat can lead to instability and BSODs. Monitoring CPU temperature is vital for identifying potential overheating issues.
Several methods exist for checking CPU temperature. Many motherboard manufacturers include software utilities that monitor system hardware parameters, including CPU temperature. These utilities often provide real-time temperature readings and alerts if temperatures exceed safe thresholds. Alternatively, third-party monitoring software, such as HWMonitor or Core Temp, can provide detailed temperature information and other hardware metrics. These tools often provide visual representations of temperature changes over time, aiding in identifying patterns or spikes that may indicate an overheating problem. Overheating can be caused by inadequate cooling (e.g., insufficient heatsink contact, malfunctioning fan), dust buildup, or a failing CPU.
Systematic Hardware Isolation Flowchart
The following flowchart illustrates a systematic approach to isolating a faulty hardware component:
“`
[Start] –> [Check Event Viewer for error codes] –> [Is there a specific hardware error code?]
| |
| | Yes –> [Identify suspected component] –> [Test suspected component]
| | No –> [Run Memory Test (MemTest86+)] –> [Memory errors found?]
| | | |
| | | Yes –> [Replace RAM] –> [End] |
| | | No –> [Monitor CPU Temperature] –> [CPU overheating?]
| | | |
| | | Yes –> [Improve CPU Cooling] –> [End] |
| | | No –> [Test Hard Drive (CrystalDiskInfo)] –> [Hard Drive errors?]
| | | |
| | | Yes –> [Replace Hard Drive] –> [End] |
| | | No –> [Test GPU (FurMark)] –> [GPU errors?]
| | | |
| | | Yes –> [Replace GPU] –> [End] |
| | | No –> [Reinstall OS] –> [Problem persists?]
| | | |
| | | Yes –> [Consider Motherboard Issue] –> [End]
| | | No –> [End]
| |
| |
|—————————————–|
| |
|No specific hardware error code found |
| in event viewer |
|—————————————–|
“`
This flowchart Artikels a basic troubleshooting process. More complex scenarios may require additional testing and deeper analysis. The tools and methods mentioned are examples, and other equivalent tools may be used.
Software and Driver Issues
Software conflicts and outdated or corrupted drivers are frequent culprits behind Blue Screen of Death (BSOD) errors. These problems can disrupt the delicate balance of your operating system, leading to system instability and ultimately, a dreaded BSOD. Understanding how to identify and address these issues is crucial for effective troubleshooting.
Software conflicts can arise when two or more programs attempt to access the same system resources simultaneously, or when incompatible software is installed. For instance, installing a new antivirus program that clashes with an existing one can lead to system instability and a BSOD. Similarly, conflicts between different versions of the same software or between software and hardware components can trigger these errors. Identifying the conflicting software often requires careful observation of error messages, event logs, and the timing of the BSOD relative to software usage.
Updating or Rolling Back Device Drivers
Updating drivers involves installing the latest versions provided by the manufacturer, often improving performance, stability, and adding new features. Conversely, rolling back a driver means reverting to a previously installed version, a useful step if a recent update caused problems. To update a driver, navigate to Device Manager (search for it in the Windows search bar), locate the device with the problematic driver, right-click, select “Update driver,” and choose either to automatically search for drivers or browse your computer for a specific driver file you’ve downloaded from the manufacturer’s website. Rolling back a driver is similarly accomplished by right-clicking the device in Device Manager, selecting “Properties,” then the “Driver” tab, and finally clicking “Roll Back Driver.” Always download drivers from the official manufacturer’s website to avoid malware or corrupted files.
Identifying Outdated or Corrupted Drivers
Several methods exist to identify outdated or corrupted drivers. Device Manager provides a clear overview of all installed devices and their driver status. A yellow exclamation mark next to a device indicates a problem with its driver. Furthermore, dedicated driver update utilities (many available commercially or as freeware) can scan your system and identify outdated or corrupted drivers. These utilities often provide details about the driver version and compare it to the latest available version. Another method involves checking the manufacturer’s website for the latest drivers for your specific hardware components. Comparing the version numbers on your system with the latest versions available will help you identify outdated drivers.
Common Driver Issues and Troubleshooting Steps
Understanding common driver issues and their associated solutions is essential for effective troubleshooting. The following list Artikels some frequent problems and recommended steps:
- Issue: Blue Screen error immediately after installing a new driver.
Troubleshooting Steps: Immediately roll back the driver using Device Manager. If the issue persists, consider reinstalling the operating system. If you suspect a corrupted driver file, download a fresh copy from the manufacturer’s website. - Issue: Intermittent BSODs related to a specific device (e.g., graphics card).
Troubleshooting Steps: Update the driver to the latest version. If the problem continues, try rolling back to a previous version. Consider running a hardware diagnostic test on the device to rule out hardware failure. - Issue: System instability and frequent crashes related to a specific peripheral (e.g., printer).
Troubleshooting Steps: Uninstall and reinstall the device’s driver. Ensure the device is properly connected and compatible with the system. Check for any conflicting software or services related to the device. - Issue: BSOD with a specific error code mentioning a driver file.
Troubleshooting Steps: Search online for the error code to identify the potentially problematic driver. Update or roll back that specific driver. If the issue is persistent, check the event viewer for more details on the error.
Advanced Troubleshooting Techniques
When basic troubleshooting steps fail to resolve a persistent Blue Screen of Death (BSOD), more advanced techniques are necessary to pinpoint the root cause. These techniques involve utilizing built-in Windows tools and understanding system behavior to isolate and fix the problem. Effective use of these tools can save significant time and effort in resolving complex hardware issues.
System Restore Points
System Restore creates checkpoints of your system’s configuration at specific points in time. Reverting to a restore point effectively rolls back system changes, including driver updates or software installations that might have triggered the BSOD. This is a non-destructive method that can quickly return your system to a known stable state. To use System Restore, search for “Create a restore point” in the Windows search bar, access System Properties, and select the System Restore tab. Choose a restore point from the list of available dates and follow the on-screen prompts. It’s crucial to select a restore point from before the BSOD started occurring. Note that reverting to a restore point will undo changes made after that point, so it’s advisable to back up important data before proceeding.
Clean Boot
A clean boot starts Windows with a minimal set of drivers and startup programs. This helps isolate whether a software conflict is causing the BSOD. By disabling non-essential services and startup applications, you can systematically determine if a specific program or driver is the culprit. To perform a clean boot, search for “msconfig” in the Windows search bar. In the System Configuration window, go to the “Services” tab, check “Hide all Microsoft services,” and then click “Disable all.” Next, go to the “Startup” tab and open Task Manager. Disable all startup programs listed. Restart your computer. If the BSOD no longer occurs, re-enable services and startup programs one by one, restarting after each, to identify the problematic software.
Windows Memory Diagnostic Tool
The Windows Memory Diagnostic tool is a built-in utility designed to scan your computer’s RAM for errors. Faulty RAM is a common cause of BSODs. This tool thoroughly tests your system’s memory, identifying potential hardware issues that may not be detected through other methods. To use the tool, search for “Windows Memory Diagnostic” in the Windows search bar. You can choose to restart your computer immediately and run the test or schedule it for the next reboot. The tool will display the results upon completion, indicating whether any errors were found. If errors are detected, it’s highly recommended to replace the faulty RAM modules.
Event Viewer Logs
The Windows Event Viewer logs record system events, including errors, warnings, and informational messages. Analyzing these logs can provide valuable clues about the cause of the BSOD. The logs often contain error codes and timestamps that can be used to pinpoint the specific driver or software component involved. To access Event Viewer, search for “Event Viewer” in the Windows search bar. Navigate to Windows Logs > System. Look for error messages around the time of the BSOD. Pay close attention to error codes and associated descriptions. Searching online for these codes often reveals helpful information about the potential cause. While interpreting Event Viewer logs requires some technical understanding, it’s a powerful tool for advanced troubleshooting.
Data Backup and Recovery
Data loss due to hardware failure, malware, or accidental deletion can be devastating, potentially resulting in significant financial and personal consequences. Regular data backups are crucial for mitigating this risk, providing a safety net to restore your system and files in the event of unforeseen circumstances. A comprehensive backup strategy should be an integral part of any responsible computer user’s routine.
Regular backups safeguard your valuable data against various threats. This includes hardware failures (like a failing hard drive), software malfunctions (including operating system crashes), malicious attacks (from viruses or ransomware), and accidental data deletion or corruption. By having a recent backup, you can quickly restore your system and files, minimizing downtime and potential data loss. The frequency of backups depends on the rate of data changes; frequent changes might necessitate daily or even hourly backups, while less frequent changes may allow for weekly or monthly backups.
System Image Backups
A system image backup creates an exact copy of your entire hard drive, including the operating system, applications, settings, and all your files. This allows for a complete system restoration to a previous point in time. This is particularly useful if your operating system becomes corrupted or your hard drive fails. Restoring from a system image is often faster than reinstalling the operating system and all your applications individually. Creating a system image typically involves using built-in operating system tools or third-party backup software. For example, Windows offers the built-in “Backup and Restore” feature (in older versions) and the “Create a recovery drive” option, which allows users to create a bootable USB drive containing a system image.
File Backups
File backups focus on specific files and folders, rather than the entire system. This method is ideal for regularly backing up documents, photos, videos, and other important data that are frequently updated or modified. File backups are often more flexible and allow for granular control over which data is backed up and restored. They can be managed using cloud storage services (such as Dropbox, Google Drive, or OneDrive), external hard drives, or network attached storage (NAS) devices. Unlike system image backups, file backups generally do not include the operating system or applications.
Data Recovery Tools and Their Functionalities
Choosing the right data recovery tool depends on the type of data loss and the storage medium involved. Some tools specialize in recovering data from hard drives, while others focus on specific file types or operating systems.
- Recuva: A free and user-friendly tool that recovers deleted files from various storage media, including hard drives, flash drives, and memory cards. It offers a simple interface and can recover various file types.
- EaseUS Data Recovery Wizard: A powerful tool that can recover data from formatted partitions, corrupted hard drives, and other data loss scenarios. It offers various recovery options and supports a wide range of file systems.
- TestDisk: A free, open-source tool that is primarily used to recover lost partitions and make non-bootable drives bootable again. It is more advanced than Recuva and requires more technical expertise.
- PhotoRec: A free, open-source data recovery tool that is specifically designed to recover photos and other multimedia files. It’s particularly useful when file systems are damaged.
BIOS/UEFI Settings and Overclocking
The BIOS (Basic Input/Output System) or UEFI (Unified Extensible Firmware Interface) is the fundamental firmware that initializes your computer’s hardware before the operating system loads. Incorrectly configured BIOS/UEFI settings can significantly impact system stability, leading to various issues, including the dreaded Blue Screen of Death (BSOD). Overclocking, a practice of pushing hardware components beyond their factory-specified speeds, further amplifies this risk. Understanding these settings and their potential consequences is crucial for maintaining a stable and reliable PC.
BIOS/UEFI settings control numerous aspects of your hardware, from boot order and power management to memory timings and CPU voltages. Even seemingly minor adjustments can have unforeseen consequences. For instance, incorrect memory timings can cause system instability and lead to crashes. Similarly, altering CPU voltage without proper understanding can cause overheating and damage to the processor. Safe modification of these settings requires a cautious approach and a basic understanding of the hardware involved.
Accessing and Modifying BIOS/UEFI Settings
Accessing the BIOS/UEFI typically involves restarting your computer and pressing a specific key (often Delete, F2, F10, F12, or Esc) repeatedly during the boot process. The exact key varies depending on the motherboard manufacturer. Once inside, navigating the menus usually involves using the arrow keys, Enter key, and potentially other keys depending on the interface. Modifying settings requires careful consideration. Each setting typically has a description, though it may be technical. It’s recommended to only change settings you understand and to note down the original values before making any modifications. Many BIOS/UEFI interfaces allow saving changes and exiting, reverting changes, or loading optimized defaults. If unsure about a specific setting, leaving it at its default value is generally the safest approach.
Risks Associated with Overclocking and BSODs
Overclocking involves increasing the clock speed of components like the CPU or GPU beyond their manufacturer’s specifications. While it can boost performance, it also carries significant risks. Increased clock speeds require higher voltages, generating more heat. This increased heat can lead to system instability, hardware damage, and BSODs. The increased heat can cause components to malfunction, leading to unpredictable behavior and crashes. Furthermore, overclocking without proper cooling can lead to irreversible hardware damage. For example, an overclocked CPU without adequate cooling might overheat, causing it to throttle or even fail completely. This can result in BSOD errors related to hardware failure or overheating.
BIOS/UEFI Settings for Optimal System Stability
Several BIOS/UEFI settings directly impact system stability. It is essential to ensure these settings are appropriately configured.
- CPU Voltage: Maintaining the CPU voltage within the manufacturer’s recommended range is crucial. Setting it too high can lead to overheating and instability, while setting it too low can cause the system to underperform or crash.
- Memory Timings and Voltage: Incorrect memory timings or voltage can cause memory errors, leading to BSODs. It’s advisable to use the XMP (Extreme Memory Profile) setting if your RAM supports it, or manually adjust the timings to values supported by your RAM modules.
- Boot Order: Ensuring the correct boot order (e.g., prioritizing the primary hard drive or SSD) is essential for preventing boot failures.
- Power Management Settings: Settings like C-states and power saving modes can affect system stability. Disabling aggressive power saving features might improve stability, especially under heavy load.
- Fan Control: Properly configuring fan curves ensures adequate cooling for all components, preventing overheating and related BSODs. Many modern motherboards offer sophisticated fan control features in the BIOS/UEFI.
Hardware Component Replacement and Installation

Replacing PC components can be daunting, but with careful planning and execution, it’s a manageable task. This section details the safe removal and installation of common hardware components, minimizing the risk of damage to both the components and your system. Remember to always ground yourself before handling any components to prevent electrostatic discharge (ESD).
RAM Module Removal and Installation
RAM installation is generally straightforward. Before beginning, ensure your computer is completely powered off and unplugged. Open the computer case, locate the RAM slots (usually near the CPU), and carefully release the clips holding the RAM modules in place. Gently pull the RAM modules straight up from the slots. To install new modules, align the notch on the RAM module with the notch in the slot and firmly press down until the clips click into place. Ensure the modules are seated correctly before closing the case and powering on your system.
Hard Drive or SSD Replacement
Replacing a hard drive or SSD involves more steps than RAM replacement, requiring careful handling of delicate components. Begin by powering down and unplugging the computer. Open the case and locate the drive bays. If the drive is connected via SATA, carefully disconnect the SATA data and power cables. If using an M.2 SSD, carefully remove the retaining screw(s). Once disconnected, gently slide the drive out of its bay. Installing a new drive involves reversing these steps: carefully slide the new drive into the bay, ensuring it’s properly seated, and reconnect the data and power cables. Secure the drive with screws if necessary. Remember to format and partition the new drive before use.
Graphics Card Replacement
Replacing a graphics card also requires a powered-down and unplugged system. Open the computer case and locate the PCIe x16 slot where the graphics card is installed. Locate the release clip(s) at the end of the slot. Gently press the clip(s) and pull the graphics card straight out of the slot. To install a new card, align the gold connectors on the card with the slot and firmly push the card into the slot until it clicks into place. Secure the card with a retaining bracket if required.
CPU Cooler Installation
Installing a new CPU cooler requires precision and attention to detail. First, power down and unplug the computer. Open the case and carefully remove the existing cooler. This often involves removing retaining screws or a mounting bracket. Apply thermal paste to the top of the CPU (a pea-sized amount is usually sufficient). Carefully align the new cooler with the CPU and fasten it securely using the provided mounting mechanism. This typically involves screws, clips, or a mounting bracket. Ensure the cooler is properly seated and all screws are tightened evenly to prevent damage to the CPU. A visual representation would show the steps: 1) Removing old cooler; 2) Applying thermal paste; 3) Aligning new cooler; 4) Securing the cooler with mounting hardware; 5) Ensuring proper seating and even tightening of screws. The image would depict each step with clear labels and detailed descriptions of the actions.