Identifying Performance Bottlenecks
A slow computer can be incredibly frustrating. Before resorting to expensive hardware upgrades, it’s crucial to identify the root cause of the slowdown. Often, the problem lies not with the hardware itself, but with inefficient software or operating system configurations. By systematically investigating potential bottlenecks, you can significantly improve your computer’s performance without spending a dime.
Common Software and Operating System Issues
Software and operating system issues are frequent culprits behind sluggish computer performance. These problems can range from poorly written applications consuming excessive resources to outdated operating system components hindering efficiency. Identifying and addressing these issues is a critical first step in optimizing your system’s speed.
- Outdated Software: Older programs may lack optimizations for modern hardware and operating systems, leading to slower performance. Regularly updating software is essential.
- Resource-Intensive Applications: Some applications, particularly video editing or gaming software, demand significant processing power, memory, and disk space. Running multiple such applications concurrently can overwhelm the system.
- Malware and Viruses: Malware can secretly consume system resources, slowing down your computer and potentially compromising your data. Regular scans with updated antivirus software are crucial.
- Excessive Startup Programs: Numerous programs automatically launching at startup can significantly increase boot times and reduce overall system responsiveness.
- Full or Fragmented Hard Drive: A hard drive nearing capacity or with fragmented files can dramatically slow down file access and overall system performance.
- Operating System Issues: A cluttered or improperly configured operating system can hinder performance. This includes unnecessary services running in the background, outdated drivers, and corrupted system files.
Impact of Bloated Startup Programs
A large number of applications configured to launch automatically at startup can significantly impact boot times and overall system responsiveness. Each program consumes resources even before you begin using it, adding up to a noticeable performance hit. For example, imagine having ten programs launching simultaneously; each might require a small amount of memory and processing power, but collectively, this can lead to a noticeable delay in boot times and slower overall system performance. This is especially noticeable on older or less powerful machines.
Identifying Resource-Intensive Processes with Task Manager
The Task Manager (or Activity Monitor on macOS) provides a real-time view of your computer’s resource usage. This allows you to pinpoint processes consuming excessive CPU, memory, or disk resources. By analyzing this information, you can identify and address performance bottlenecks.
- Open the Task Manager (usually by pressing Ctrl+Shift+Esc on Windows).
- Navigate to the “Processes” tab.
- Observe the CPU, Memory, and Disk columns to identify processes using a disproportionate amount of resources. Pay particular attention to processes consistently using high percentages of these resources.
- Right-click on resource-intensive processes to end them (use caution, only end processes you recognize and understand). Note that ending essential system processes can lead to instability.
Analyzing Disk Space Usage
Analyzing disk space usage helps identify large or unnecessary files that are consuming valuable storage space and potentially impacting performance. A cluttered hard drive can lead to slower file access times and overall system sluggishness.
- Open File Explorer (Windows) or Finder (macOS).
- Navigate to the drive you wish to analyze (usually C: on Windows).
- Sort files by size to easily identify the largest files and folders.
- Review the contents of large folders to determine if they contain unnecessary files that can be deleted or moved to external storage.
- Utilize disk cleanup utilities (built-in to most operating systems) to remove temporary files and other unnecessary data.
Cleaning Up the System
A cluttered system is a slow system. Removing unnecessary files, programs, and processes can significantly improve your computer’s performance. This involves several steps, each contributing to a leaner, more efficient operating system. Let’s explore these crucial cleanup tasks.
Uninstalling Unnecessary Programs and Applications
Many programs are installed over time, some used infrequently or not at all. These consume valuable disk space and system resources. Identifying and uninstalling these unused applications is a simple yet effective way to boost performance. To uninstall a program, typically navigate to your operating system’s Control Panel (or Settings app in Windows 10 and later) and locate the “Programs and Features” (or “Apps & features”) section. Select the program you wish to remove and follow the on-screen prompts. Be sure to only uninstall programs you are certain you no longer need.
Removing Temporary Files and Cache Data
Temporary files and cache data accumulate over time, storing temporary information that applications use. While beneficial for quick access to frequently used data, an excessive build-up can slow down your system. Most operating systems provide built-in tools to clear this data. In Windows, you can use Disk Cleanup (search for it in the Start Menu). On macOS, you can manually delete files from the `/tmp` directory (though caution is advised as this directory is actively used by the system) or utilize third-party applications designed for this purpose. Regularly clearing temporary files helps maintain optimal system performance.
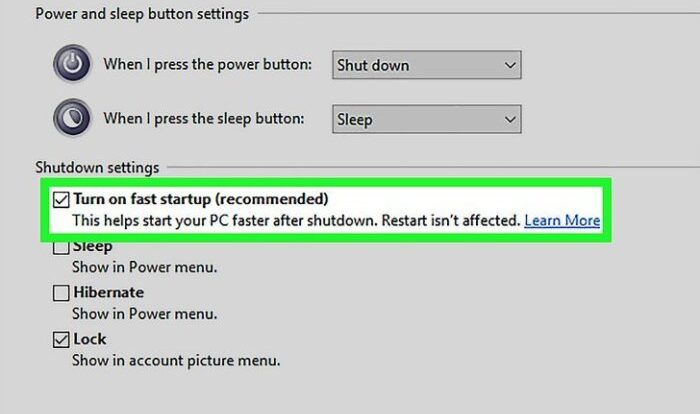
Disabling or Removing Startup Programs
Many applications automatically launch when your computer starts, consuming resources and extending boot time. Disabling or removing these startup programs can dramatically reduce boot times and improve overall responsiveness. In Windows, you can manage startup programs through Task Manager (Ctrl+Shift+Esc). On macOS, you can manage startup items within System Preferences. Review the list of startup programs and disable those you don’t need to launch automatically. Prioritize disabling programs that consume significant resources, often indicated by their memory usage.
Defragmenting the Hard Drive (HDD)
Defragmentation rearranges files on a hard disk drive (HDD) to improve access speed. Fragmented files are scattered across the disk, causing the read/write heads to move more frequently, slowing down access. Defragmentation consolidates these fragments, resulting in faster file access. However, defragmentation is not necessary for Solid State Drives (SSDs). SSDs utilize flash memory and have no moving parts, making defragmentation unnecessary and potentially harmful.
| Feature | Defragmentation (HDD) | SSD Optimization |
|---|---|---|
| Process | Rearranges fragmented files on the hard drive. | Focuses on maintaining the health of the SSD’s flash memory, including wear leveling and garbage collection. |
| Benefits | Improves file access speed on HDDs, leading to faster loading times and overall system responsiveness. | Extends the lifespan of the SSD, improves write speeds, and maintains overall performance. |
| Drawbacks | Can be time-consuming, especially on large drives. Not applicable to SSDs and can be detrimental. | No significant drawbacks; built-in optimization is generally sufficient. Over-optimization might be counterproductive. |
Optimizing Software Settings
Optimizing your software settings can significantly boost your computer’s performance without requiring any hardware upgrades. This involves carefully adjusting various aspects of your operating system and applications to minimize resource consumption and maximize efficiency. Focusing on power management, visual effects, driver updates, and features like ReadyBoost can yield noticeable improvements.
Power Settings
Power settings directly impact performance and battery life, especially on laptops. Choosing a balanced power plan is generally recommended. High-performance plans prioritize speed but consume more power, while power-saver plans extend battery life at the cost of performance. A balanced plan attempts to find a compromise between these two extremes. Within the balanced plan, you can often further adjust settings such as screen brightness and sleep timers. Reducing screen brightness significantly reduces power consumption, and setting shorter sleep timers can improve responsiveness when resuming work. Experimentation is key to finding the optimal balance for your needs.
Visual Effects and Animations
Windows and other operating systems incorporate visual effects and animations to enhance the user experience. However, these effects can consume significant processing power, particularly on older machines. Disabling or reducing the number of visual effects can lead to a noticeable performance increase. This typically involves adjusting settings within the operating system’s performance options. For example, turning off animations such as window transparency, minimizing shadows, and disabling visual themes can free up system resources. The extent to which you reduce visual effects will depend on your personal preference and the performance limitations of your system. The goal is to find a balance between visual appeal and system responsiveness.
Driver Updates
Outdated or corrupted drivers can significantly hinder performance. Regularly updating drivers for key components such as graphics cards, network adapters, and sound cards ensures optimal functionality and can improve performance. Drivers are software programs that allow your operating system to communicate with your hardware. Outdated drivers may not be optimized for your system’s capabilities, leading to slower speeds and instability. You can typically update drivers through the device manager in your operating system or by visiting the manufacturer’s website for your specific hardware. It’s important to download drivers specifically designed for your operating system version and hardware model. After updating, restart your computer to ensure the changes take effect.
Windows ReadyBoost (and Equivalents)
Windows ReadyBoost (and similar features in other operating systems) uses a USB flash drive or other removable storage device as an extension of your computer’s RAM. This can improve performance by providing faster access to frequently used data. However, the benefits are most noticeable on systems with limited RAM. Using a fast USB drive (USB 3.0 or better) is crucial for effective ReadyBoost functionality. A slow drive can actually hinder performance. The impact of ReadyBoost varies greatly depending on the system’s specifications and usage patterns. It’s advisable to test the effect of enabling ReadyBoost and monitor system performance to determine if it provides a tangible benefit. If it doesn’t improve performance, or even slows it down, it’s best to disable the feature.
Improving Software Efficiency
Software efficiency plays a crucial role in overall system performance. A bloated software environment, filled with resource-intensive applications and poorly optimized settings, can significantly impact your computer’s speed and responsiveness. Addressing software inefficiencies is often a more impactful approach than simply upgrading hardware, particularly for older machines. This section focuses on practical strategies to streamline your software and reclaim valuable system resources.
Browser Extensions and Add-ons
Browser extensions and add-ons, while offering convenient functionality, can significantly impact system performance. Each extension runs as a separate process, consuming memory and processing power. Over time, the accumulation of extensions can lead to a noticeable slowdown in browsing speed and overall system responsiveness. The following table provides examples of common extensions and their potential resource consumption. Note that actual resource usage can vary based on the specific extension, its activity, and the website being visited.
| Extension Type | Example Extension | Potential Resource Impact (RAM/CPU) | Notes |
|---|---|---|---|
| Ad Blocker | uBlock Origin, Adblock Plus | Moderate to High (RAM) | Highly dependent on website ad density; can impact page loading times. |
| Password Manager | LastPass, Bitwarden | Low to Moderate (RAM) | Generally well-optimized, but resource use increases with the number of saved passwords. |
| VPN | NordVPN, ExpressVPN | Moderate to High (CPU, RAM) | Encrypting and decrypting data is computationally intensive. |
| Productivity Tools | Grammarly, Evernote Web Clipper | Low to Moderate (RAM) | Resource usage depends on the tool’s active features. |
Managing Browser Cache and Cookies
Browser caches and cookies store temporary files and data that improve website loading speeds. However, excessive accumulation of these files can lead to performance degradation. Regularly clearing your browser cache and cookies can free up disk space and improve browsing speed. This involves accessing your browser’s settings and locating the options to clear browsing data, including cache, cookies, and browsing history. The frequency of this cleaning depends on your browsing habits, but a weekly or bi-weekly purge is generally recommended.
Disabling Unnecessary Background Processes
Many applications run background processes that consume system resources even when not actively used. Identifying and disabling these unnecessary processes can significantly improve performance. Most operating systems provide tools to manage running processes (Task Manager in Windows, Activity Monitor in macOS). Review the list of running applications, and disable those that are not actively needed. Prioritize disabling resource-intensive applications that consistently consume high CPU or memory usage.
Managing Virtual Memory
Virtual memory allows the operating system to use hard drive space as an extension of RAM. When RAM is full, the system swaps less frequently used data to the hard drive, which can significantly slow down performance. Managing virtual memory involves adjusting the size of the paging file (Windows) or swap space (macOS). Increasing the size of the paging file can improve performance if you consistently experience low RAM conditions, but excessively large paging files can also lead to slower disk access times. A balanced approach is crucial; consider the available RAM and hard drive space when making adjustments.
System Restore and Backup
Regular system backups and the strategic use of system restore points are crucial for maintaining data integrity and ensuring a quick recovery from unforeseen issues. These features offer a safety net, allowing you to undo detrimental changes or restore your system to a previously stable state. Properly utilizing these tools can significantly reduce downtime and prevent data loss.
Creating a system restore point acts as an insurance policy before making significant system changes, such as installing new software or drivers. A full system backup, on the other hand, provides a complete image of your hard drive, enabling a complete system recovery in case of a catastrophic failure. A clean boot, a troubleshooting technique, isolates the source of startup problems by loading only essential drivers and services. Finally, System Restore utilizes previously created restore points to return your system to a functional state.
Creating a System Restore Point
Before installing new software, drivers, or making significant system changes, creating a restore point is recommended. This allows you to revert to a previous state if problems arise. In Windows, this is typically accessed through the “Create a restore point” option within the System Properties window (search for “create a restore point” in the Start Menu). Clicking “Create” will initiate the process, saving a snapshot of your system’s configuration. It’s advisable to provide a descriptive name for the restore point, such as “Before installing new graphics driver,” to easily identify it later.
Creating a Full System Backup
A full system backup creates a complete image of your hard drive, including the operating system, applications, and user data. This is essential for recovering from a complete system failure, hard drive crash, or malware infection. Windows offers built-in backup tools (search for “Backup and Restore” in the Start Menu), or third-party backup software can be used. These tools typically allow you to choose a backup destination, such as an external hard drive or network location. Regular backups, ideally scheduled automatically, are recommended to ensure data safety. Remember to test your backups periodically to ensure they are functional and restorable.
Performing a Clean Boot
A clean boot starts Windows with a minimal set of drivers and startup programs. This helps identify if a third-party application or service is causing a system problem. Access the System Configuration utility (search for “msconfig” in the Start Menu). Navigate to the “Services” tab, check “Hide all Microsoft services,” and then click “Disable all.” Next, go to the “Startup” tab and open Task Manager. Disable all startup programs listed. Restart your computer. If the problem is resolved, you can systematically re-enable services and startup programs to pinpoint the culprit.
Using System Restore
System Restore uses previously created restore points to revert your system to a previous state. Access System Restore through the “Create a restore point” option (as described above). Select a restore point from the list; choose one created before the problem occurred. Review the changes that will be made, and if satisfied, proceed with the restoration. This process will restart your computer and revert your system to the selected point in time. Note that this process might delete some recently created files and settings.