Understanding Windows 10 Boot Process
The Windows 10 boot process is a complex sequence of events that loads the operating system and prepares it for use. Understanding this process is crucial for troubleshooting startup issues. A successful boot involves several key components working together seamlessly. Failures at any stage can result in boot errors.
The Windows 10 boot process can be broadly divided into several key stages, each with its specific functions and dependencies. A disruption in any stage can lead to a failed boot, highlighting the importance of each step’s integrity.
Stages of the Windows 10 Boot Sequence
The boot process begins with the Power On Self Test (POST), a hardware check performed by the BIOS or UEFI firmware. This verifies the basic hardware components are functioning correctly. Following the POST, the system searches for bootable devices, typically a hard drive or SSD, according to the boot order specified in the BIOS/UEFI settings. Once a bootable device is found, the boot loader is loaded. This initiates the loading of the operating system. The Windows Boot Manager then takes over, presenting the user with a boot menu or automatically loading the default operating system. Finally, the Windows kernel and other essential system files are loaded, culminating in the graphical user interface (GUI) appearing.
The Role of the Boot Configuration Data (BCD)
The Boot Configuration Data (BCD) store is a database containing critical information about boot devices, operating systems, and boot options. It’s a crucial component of the Windows boot process. The BCD acts as a central directory, guiding the boot manager to the correct operating system and its associated files. The BCD is crucial because it contains the necessary parameters for Windows to locate and load the operating system files. Corruption or damage to the BCD can prevent Windows from booting correctly. A properly configured BCD ensures a smooth and efficient boot process.
Windows Boot Manager and its Interaction with the Operating System
The Windows Boot Manager is a small program responsible for displaying the boot menu and initiating the loading of the selected operating system. It acts as an intermediary between the firmware and the operating system. The Boot Manager interacts with the BCD to identify available operating systems and their boot options. Based on the user selection or the default settings, the Boot Manager loads the appropriate boot loader for the selected operating system. This boot loader then initiates the loading of the Windows kernel and other system components, ultimately leading to the launch of the Windows operating system. Without a functional Boot Manager, the system cannot proceed past the initial boot stages.
Step-by-Step Breakdown of Windows Startup Repair
When Windows encounters a boot problem, it may automatically initiate Startup Repair. This process attempts to automatically diagnose and fix common boot issues. The steps involved generally include:
- Automatic Diagnostics: Startup Repair first performs an automated scan of the system’s boot files and critical system components. This check identifies potential problems such as corrupted system files or registry errors.
- Repair Attempts: Based on the diagnostic results, Startup Repair attempts to automatically fix the identified issues. This may involve repairing corrupted boot files, rebuilding the BCD, or repairing the master boot record (MBR).
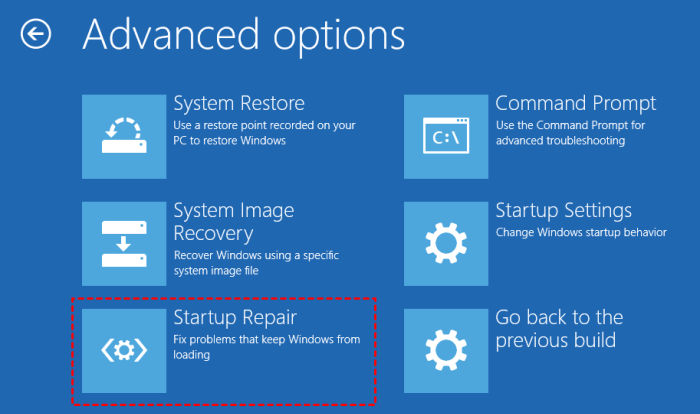
- Advanced Options: If automatic repair fails, Startup Repair presents the user with a menu of advanced options, such as System Restore, Command Prompt, and other troubleshooting tools. These options provide more manual control over the repair process, allowing for more targeted fixes.
- Completion: If the repair is successful, Windows will boot normally. If not, the user may need to explore more advanced troubleshooting steps or consider a system reinstall.
The effectiveness of Startup Repair varies depending on the nature and severity of the boot problem. While it often resolves minor issues, more serious problems may require more advanced intervention.
Diagnosing Boot Problems After Startup Repair Failure
Startup Repair, while a helpful tool, doesn’t always resolve Windows 10 boot issues. When it fails, more in-depth troubleshooting is necessary to pinpoint the root cause. This involves systematically investigating potential software and hardware problems, and understanding the specific error messages provided.
Common Causes of Persistent Boot Failures After Startup Repair and Corresponding Error Messages
Common Causes of Persistent Boot Failures
Persistent boot problems after Startup Repair often stem from more significant issues than a simple system file corruption. These issues can range from damaged or missing boot files to failing hardware components. A crucial first step is to carefully examine any error messages displayed during the failed startup attempts. These messages often provide valuable clues about the problem’s origin.
Examples of Error Messages During Failed Startup Repairs
Error messages can vary greatly, but some common examples include: “Your PC needs to be repaired,” “Boot device not found,” “Inaccessible boot device,” “0xc000000e,” “0xc000000f,” and “0xc0000225.” The specific code or message can help narrow down the potential causes. For example, “Boot device not found” often points towards a problem with the hard drive or its connection, while codes like 0xc000000e or 0xc000000f frequently indicate corrupted boot sector or BCD (Boot Configuration Data) issues.
Potential Hardware Issues Leading to Boot Problems
Hardware malfunctions can significantly impact the boot process. A failing hard drive (HDD) or solid-state drive (SSD) is a frequent culprit. Symptoms might include clicking sounds from the drive, unusually slow boot times, or the system repeatedly failing to boot. Other potential hardware issues include faulty RAM (Random Access Memory), a failing power supply, or a problem with the motherboard. A failing CPU (Central Processing Unit) is less common as a cause of boot failures, but it’s possible.
Methods for Checking the Integrity of Windows System Files
Verifying the integrity of Windows system files is crucial after a failed Startup Repair. The System File Checker (SFC) tool is a built-in utility that can scan for and repair corrupted system files. To run SFC, you’ll typically need to boot into a recovery environment (like the Windows Recovery Environment – WinRE) and open an elevated command prompt. The command is: sfc /scannow. Another useful tool is Deployment Image Servicing and Management (DISM), which can repair the Windows image itself. The command for DISM is: DISM /Online /Cleanup-Image /RestoreHealth. Both commands require administrator privileges and can take some time to complete. After running these tools, restarting the computer is necessary to see if the boot problem is resolved.
Troubleshooting Techniques

When Windows 10 startup repair fails, more advanced troubleshooting is necessary. System File Checker (SFC) and Deployment Image Servicing and Management (DISM) are powerful command-line tools that can often resolve boot problems stemming from corrupted system files or Windows components. These tools provide a deeper level of repair than the basic startup repair process.
System File Checker (SFC) Functionality and Usage
The System File Checker (SFC) scans all protected system files and replaces corrupted files with cached copies. It’s a crucial first step in addressing boot issues that might originate from damaged core Windows components. This tool verifies the integrity of critical system files and repairs them if necessary. The process involves running a command prompt as an administrator and executing a single command.
- Boot your computer into Windows 10, even if it’s experiencing boot problems. If you can’t boot normally, try booting into Safe Mode.
- Search for “cmd” in the Start Menu.
- Right-click on “Command Prompt” and select “Run as administrator”.
- Type the following command and press Enter:
sfc /scannow - The scan will take some time to complete. Do not interrupt the process.
- Once completed, a message will indicate whether any corrupted files were found and repaired. Restart your computer to apply the changes.
For example, a successful scan might display a message like: “Windows Resource Protection found corrupt files and successfully repaired them.” Conversely, an unsuccessful scan might indicate that further troubleshooting is required.
Deployment Image Servicing and Management (DISM) Functionality and Usage
Deployment Image Servicing and Management (DISM) is a more comprehensive tool than SFC. It can repair the Windows image itself, addressing issues that SFC might not be able to handle. DISM can repair corrupted system files, even if the cache is also damaged, making it a valuable tool when SFC fails. The process is similar to using SFC, requiring administrator privileges.
- Follow steps 1-3 from the SFC instructions above to open an elevated command prompt.
- Type the following command and press Enter:
DISM /Online /Cleanup-Image /RestoreHealth - This command will scan and repair the Windows image. The process may take a considerable amount of time; be patient and avoid interrupting it.
- Upon completion, restart your computer.
An example of a successful DISM operation might include a message confirming that the operation completed successfully and the health of the Windows component store was restored.
Comparing SFC and DISM in Resolving Boot Issues
Both SFC and DISM are valuable tools for resolving boot problems in Windows 10. SFC is generally faster and easier to use, focusing primarily on repairing corrupted system files using cached copies. DISM is a more powerful tool, capable of repairing the Windows image itself, even if the cached copies are corrupted. It is often used after SFC fails to resolve the issue. In many cases, it’s best practice to run SFC first, and then use DISM if SFC is unable to resolve the problem. Using both tools increases the chances of success in resolving boot problems without requiring a complete reinstallation of Windows.
Advanced Troubleshooting Steps
If standard startup repair fails to resolve your Windows 10 boot issues, more advanced techniques are necessary. These methods involve using command-line tools and accessing deeper system recovery options. Improper use of these tools can potentially cause data loss, so proceed with caution and consider backing up important data beforehand if possible.
Bootrec.exe Command-Line Options
The `bootrec.exe` command-line utility offers several options for repairing boot-related problems. It’s a powerful tool, but incorrect usage can lead to further complications. Always understand the function of each command before executing it.
| Command | Function | Example Usage | Notes |
|---|---|---|---|
bootrec /fixmbr | Rewrites the Master Boot Record (MBR). This is useful if the MBR is corrupted or damaged, preventing Windows from loading. | bootrec /fixmbr | Use this if you suspect MBR corruption. |
bootrec /fixboot | Rewrites the boot sector. The boot sector contains the instructions for booting the operating system. This is often used in conjunction with /fixmbr. | bootrec /fixboot | This command typically follows /fixmbr. |
bootrec /scanos | Scans for Windows installations on your hard drive. This is helpful if Windows is installed on multiple partitions or if the boot manager isn’t correctly pointing to the correct Windows installation. | bootrec /scanos | Useful when multiple OS installations exist. |
bootrec /rebuildbcd | Rebuilds the Boot Configuration Data (BCD). The BCD stores information about all bootable operating systems on your computer. This is often the most effective command for resolving boot problems. | bootrec /rebuildbcd | This command is frequently the solution for boot failures. |
Accessing the Windows Recovery Environment (WinRE)
The Windows Recovery Environment (WinRE) provides access to advanced troubleshooting tools. Accessing WinRE usually requires restarting your computer multiple times or using installation media.
To access WinRE from within Windows, you can typically navigate to Settings > Update & Security > Recovery and select “Restart now” under Advanced startup. Alternatively, repeatedly pressing a key (often F8, F12, or Shift+F8, but this varies depending on your system’s BIOS settings) during startup might bring up a boot menu offering access to recovery options. If your system fails to boot entirely, you’ll need to use a Windows installation USB drive or DVD to access WinRE.
Performing a System Restore
System Restore allows you to revert your system to a previous point in time, potentially undoing changes that caused the boot problem. This process only affects system files and settings; your personal files will typically remain untouched.
Within WinRE, you’ll find a “System Restore” option. Select it and follow the on-screen prompts. You’ll be presented with a list of restore points. Choose a point prior to when the boot problems started. Keep in mind that this requires a previously created restore point.
Repairing the Boot Process Using Windows Installation Media
If all else fails, using a Windows installation USB drive or DVD offers the most comprehensive repair options.
Boot from the installation media. Once the Windows setup screen appears, select “Repair your computer.” This will launch WinRE, providing access to advanced troubleshooting options, including startup repair, system restore, and command prompt, where you can again utilize `bootrec.exe`. This method is the most thorough and is recommended if other techniques prove unsuccessful.
Hardware Considerations
Boot failures in Windows 10 aren’t always software-related; often, underlying hardware issues are the culprits. A systematic approach to hardware diagnostics is crucial for effective troubleshooting, especially when startup repair fails. This section will explore potential hardware problems and methods for identifying them.
Identifying potential hardware problems that could cause boot failures involves examining components crucial for the boot process. Faulty RAM, a failing hard drive, or a malfunctioning power supply can all prevent Windows from loading correctly. BIOS/UEFI issues can also interrupt the initial stages of booting, preventing the operating system from even beginning to load. These problems often manifest as error messages, system freezes, or an inability to reach the login screen.
RAM Integrity Testing
Testing the integrity of your RAM is a critical step in diagnosing boot problems. Faulty RAM can cause unpredictable system behavior, including boot failures, random crashes, and data corruption. Memory testing tools, such as Windows Memory Diagnostic or MemTest86+, are readily available. These tools perform rigorous tests to identify any errors within your system’s RAM. Windows Memory Diagnostic can be accessed from within Windows, while MemTest86+ requires booting from a bootable USB drive or CD. A successful test confirms RAM functionality; failures indicate the need for RAM replacement.
Hard Drive Integrity Testing
Similar to RAM, a failing hard drive can lead to boot failures. Bad sectors, failing read/write heads, or general drive wear can prevent the system from accessing the necessary boot files. Tools like CHKDSK (within Windows) and third-party utilities like CrystalDiskInfo can assess hard drive health. CHKDSK scans the drive for errors and attempts to repair them. CrystalDiskInfo provides a comprehensive overview of the drive’s health, including SMART (Self-Monitoring, Analysis and Reporting Technology) data, which reveals potential problems before they cause a complete failure. Significant errors or warnings from these tools point towards a failing hard drive that may require replacement or data recovery.
BIOS/UEFI Role and Troubleshooting
The BIOS (Basic Input/Output System) or UEFI (Unified Extensible Firmware Interface) is the firmware that initializes hardware components and starts the boot process. Issues within the BIOS/UEFI can prevent the system from booting correctly. These problems can manifest as a black screen, a failure to detect storage devices, or boot errors related to boot order or hardware initialization. Troubleshooting BIOS/UEFI issues often involves resetting the BIOS to factory defaults (often by clearing the CMOS using a jumper on the motherboard) or updating the BIOS firmware to the latest version provided by the motherboard manufacturer. Incorrect BIOS settings, such as a wrong boot order, can also prevent booting; carefully reviewing and correcting these settings is crucial.
Hardware Component Inspection Checklist
Before undertaking advanced troubleshooting, a visual inspection of key hardware components can reveal obvious problems.
- Power Supply: Check for any visible damage, loose connections, or unusual noises. A faulty power supply can prevent the system from booting altogether.
- Motherboard: Inspect for any signs of damage, such as burnt components or loose connections. Look for any bulging capacitors, which are a common sign of failure.
- RAM Modules: Ensure the RAM sticks are firmly seated in their slots. Try reseating them to ensure proper contact.
- Hard Drive/SSD: Check for any physical damage to the drive itself. Listen for unusual noises, such as clicking or grinding sounds, which indicate potential failure.
- CPU: While less likely to cause boot issues directly, a visibly damaged CPU or loose heatsink is worth investigating.
- Internal Connections: Verify that all cables (power, data, SATA) are securely connected to both the components and the motherboard.
Preventing Future Boot Problems
Maintaining a healthy Windows 10 installation is crucial for preventing future boot problems and ensuring smooth computer operation. Proactive measures, including regular updates and backups, coupled with robust security software, significantly reduce the risk of encountering frustrating boot issues. This section Artikels best practices to keep your system running optimally.
Regular system updates and backups are fundamental to a stable Windows 10 installation. These processes not only patch security vulnerabilities that could lead to malware infections but also incorporate performance improvements and bug fixes that enhance system stability. Neglecting these crucial steps significantly increases the likelihood of encountering boot problems.
System Updates and Backups
Windows Update automatically downloads and installs critical updates, but it’s essential to actively check for and install these updates regularly. These updates often address critical bugs that can directly impact the boot process. For example, a faulty driver update might cause a system crash during startup, leading to boot failure. Similarly, creating regular backups of your system’s critical data and files is crucial. A complete system image backup allows for a quick restoration in the event of a catastrophic failure, minimizing downtime and data loss. Consider using Windows’ built-in backup functionality or a third-party backup solution that suits your needs and frequency preferences. A schedule of weekly or monthly backups, depending on your data modification rate, is generally recommended. Incremental backups, which only save changes since the last backup, are more efficient in terms of storage space.
Preventative Maintenance Schedule
Implementing a preventative maintenance schedule ensures consistent system health and minimizes the risk of boot problems. This schedule should include:
- Weekly: Run a full system scan with your antivirus and antimalware software. Check for and install any pending Windows Updates. Consider a quick disk cleanup to remove temporary files.
- Monthly: Perform a complete system backup. Run a disk defragmentation utility (if using a traditional hard drive). Check your hard drive health using system monitoring tools.
- Quarterly: Perform a more thorough system cleanup, removing unnecessary programs and files. Consider using a dedicated disk cleanup tool for a more comprehensive scan.
- Annually: Consider a complete system reinstall, especially if you’ve encountered significant performance degradation or persistent errors. This is a more drastic measure, but it can resolve deep-seated issues that other maintenance tasks cannot address.
This schedule provides a framework; adjust it based on your system’s usage and individual needs. The key is consistency.
Antivirus and Antimalware Protection
A reliable antivirus and antimalware solution is a critical component of preventative maintenance. Malware infections can significantly disrupt the boot process, leading to system instability or complete failure. A comprehensive security suite should include real-time protection, scheduled scans, and the ability to detect and remove various types of malware, including viruses, spyware, and ransomware. Regularly updating your antivirus definitions is equally important, ensuring your system remains protected against the latest threats. Examples of reliable solutions include Windows Defender (built into Windows 10), as well as numerous commercial options like Norton, McAfee, and Bitdefender. Choosing a reputable vendor with good reviews is essential. It’s also advisable to avoid downloading software from untrusted sources to minimize the risk of infection.